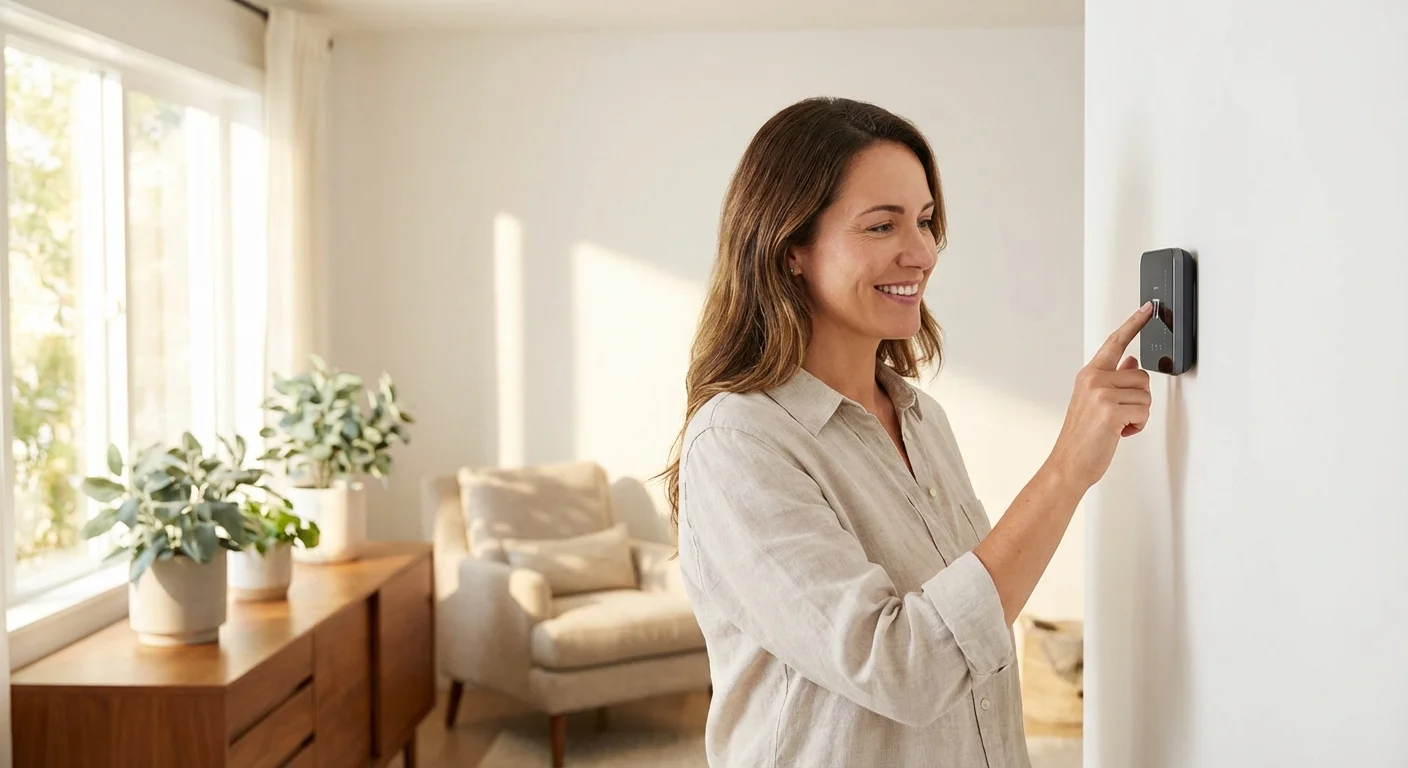
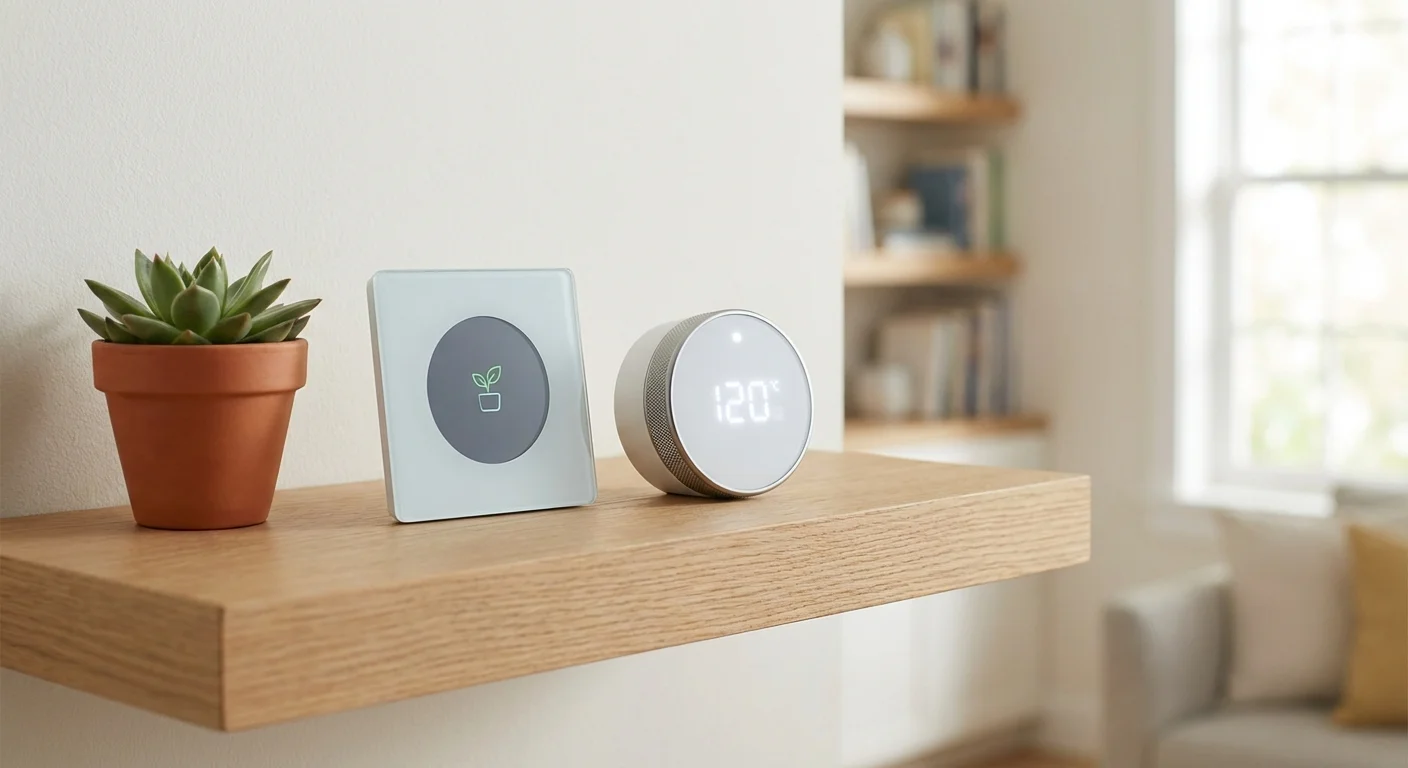
Heating and cooling account for nearly half of the energy used in a typical home. Despite this massive footprint, many people still rely on outdated, manual dials that force their HVAC systems to work harder than necessary. Upgrading your home with a modern climate control system gives you direct, precise control over your energy consumption; it allows you to cool or heat your living space only when you actually need it.
Taking on a smart thermostat DIY guide might feel intimidating, especially when you pull a plastic cover off your wall and stare at a confusing cluster of brightly colored wires. Dealing with home electrical systems naturally causes hesitation. However, modern thermostat systems are designed specifically for the everyday homeowner. Manufacturers have streamlined the process, replacing complex wiring diagrams with intuitive smartphone apps and simple plug-and-play baseplates.
This comprehensive walkthrough will show you exactly how to safely remove your old unit, decode your existing smart thermostat wiring, and mount your new device securely. Whether you are dealing with a brand-new build or a decades-old home, you can complete this project in a single afternoon.
The Essentials: What You Need to Know Before Starting
Before pulling out the drill, take a moment to understand the scope of the project. Preparing your workspace and gathering the right materials prevents frustrating mid-project trips to the hardware store.
- Estimated Time: 45 to 60 minutes.
- Difficulty Level: Beginner to Intermediate.
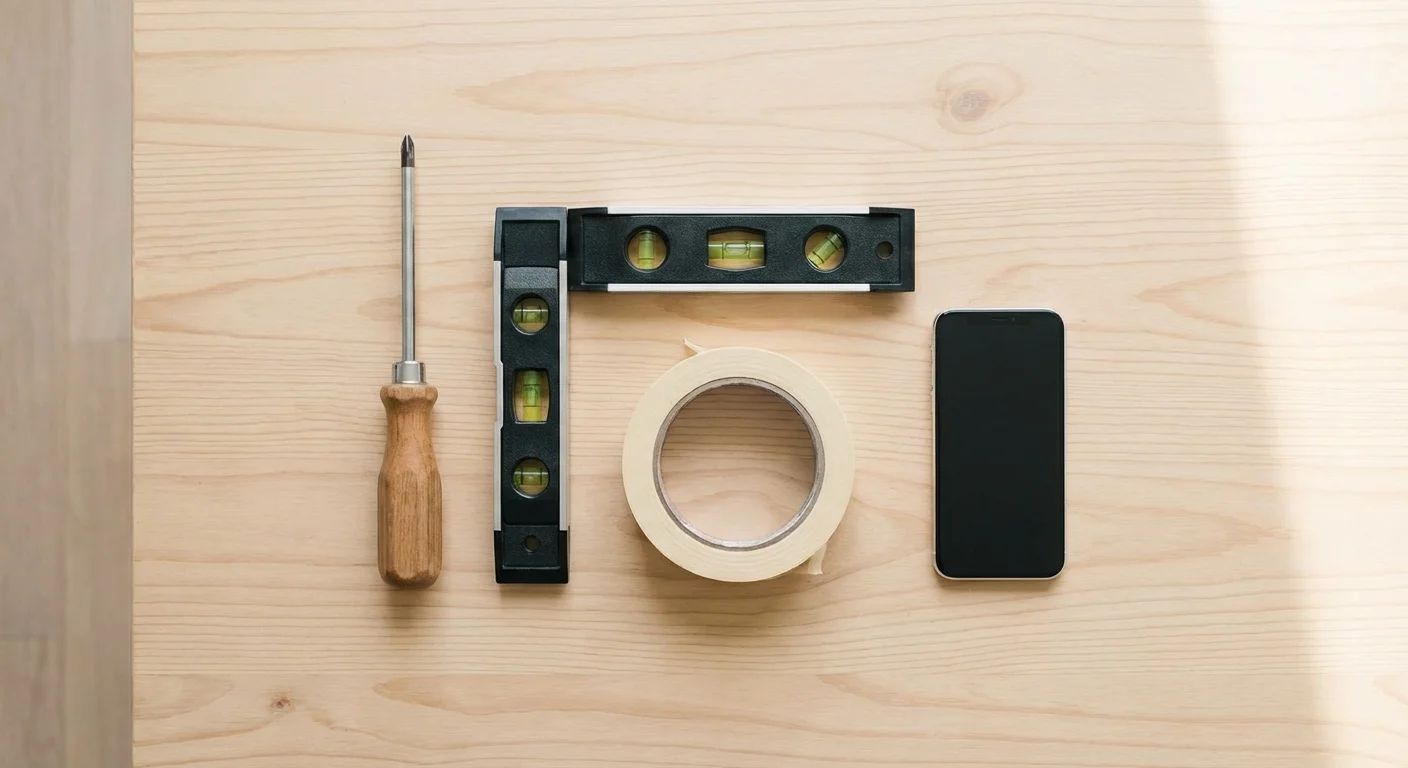
- Required Tools: A small flathead screwdriver, a Phillips-head screwdriver, a smartphone with a camera, a power drill with a 3/16-inch bit, a small level, and masking tape or wire labels.
- Optional but Helpful: Drywall spackle and touch-up paint (in case the new thermostat base is smaller than your old one), needle-nose pliers, and a multimeter to verify power is off.
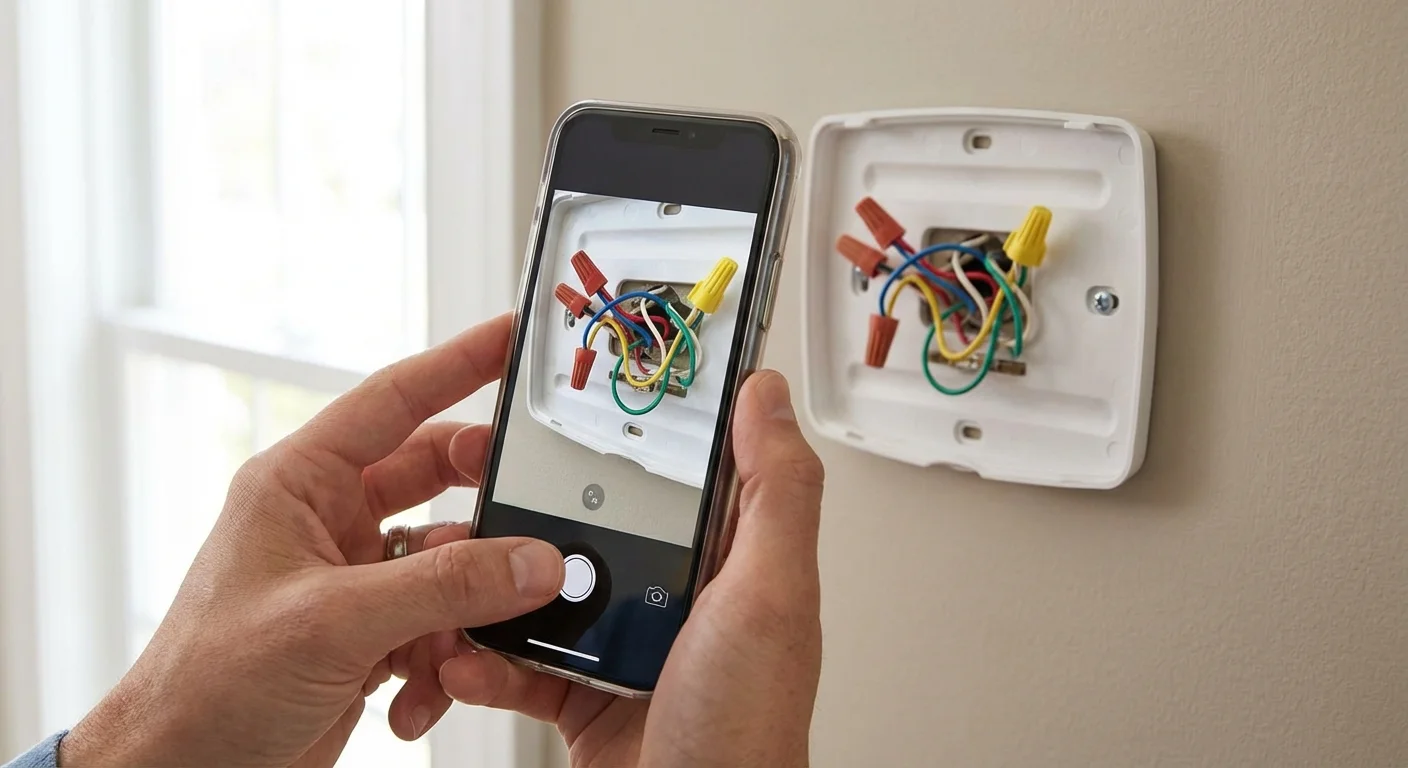
“The most crucial step in any thermostat replacement isn’t the wiring itself—it’s taking a clear, well-lit photograph of the existing wire connections before you loosen a single screw. That photo is your roadmap home if you get confused.” — Richard Trethewey, Plumbing and Heating Expert
Pre-Installation: Decoding Your Current HVAC Setup
Not all heating and cooling systems speak the same language. Your first critical task is determining if your current system is compatible with a standard smart thermostat. Most modern smart units require low-voltage systems, which operate on 24 volts. These systems typically control central air conditioning, standard gas or oil furnaces, and heat pumps.
If you live in an older home with baseboard heaters or radiant floor heating, you might have a high-voltage (or line-voltage) system. High-voltage systems operate on 120 or 240 volts and can be incredibly dangerous to handle without professional training. You can identify a high-voltage system by looking at the wires behind your current thermostat faceplate. If you see thick, stranded wires connected by wire nuts—or a warning label explicitly mentioning 120V/240V—stop immediately. Standard smart thermostats will not work with these systems, and connecting them could destroy the device or start a fire. You will need a specific line-voltage smart thermostat designed for electric baseboards.
For low-voltage systems, carefully pull your existing thermostat faceplate off the wall. Most snap right off with a gentle tug, though some might require loosening a small set screw at the bottom. Once the cover is off, you will see a series of thin, solid copper wires plugged into lettered terminals.
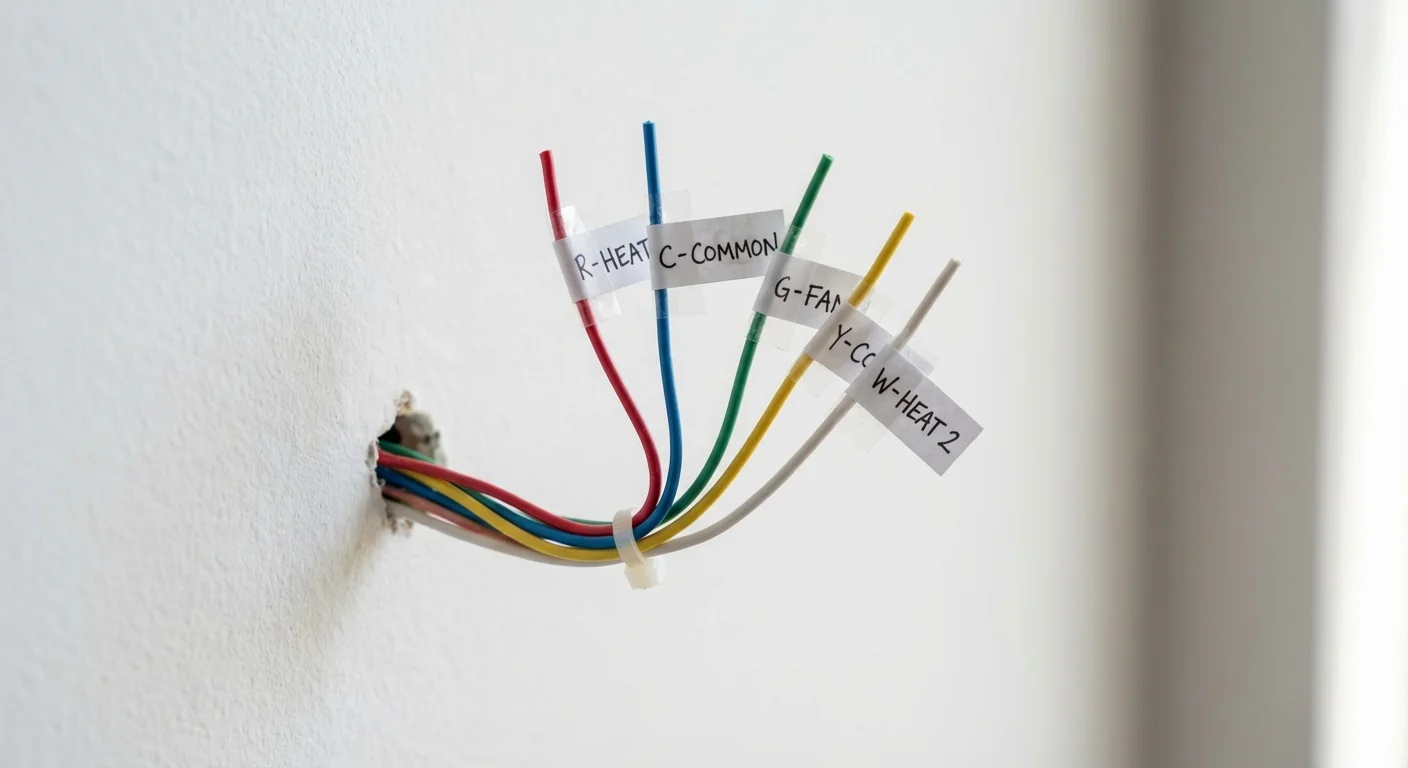
According to Energy Star, correctly identifying these wires is the foundation of a successful installation. You will likely see wires plugged into terminals labeled R, W, Y, G, and C. Take your smartphone and snap three or four clear pictures of these connections from different angles. Ensure the terminal letters and the corresponding wire colors are easily readable. Do not rely on your memory; a digital record is non-negotiable.
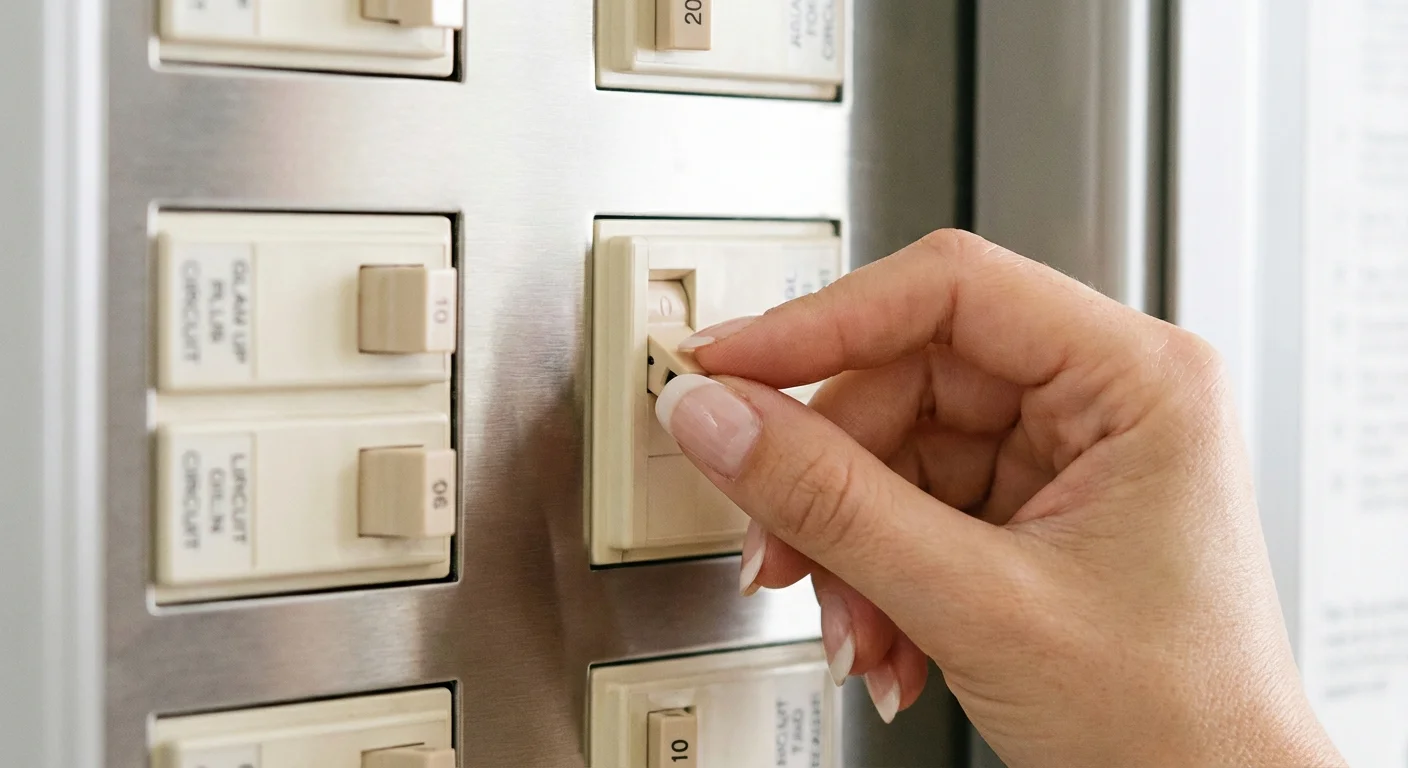
Step 1: Turn Off the Power (And Verify It)
Never work on an active electrical circuit. While 24 volts is generally not enough to cause serious harm to a person, it is more than enough to short out your furnace’s control board. If two exposed wires touch while the power is live, you could blow a fuse hidden deep inside your HVAC system, turning a quick DIY project into an expensive service call.
Locate your home’s main electrical panel. Search for the breaker labeled “Furnace,” “Air Handler,” “HVAC,” or “A/C.” Flip this switch to the “Off” position. In some homes, the heating and cooling systems are on separate breakers; if so, turn them both off.
Verify the power is disconnected by returning to your old thermostat. Adjust the temperature drastically—push the heat up to 80 degrees or the AC down to 60 degrees. Wait three to five minutes. If you do not hear the system kick on and feel air blowing from your vents, you have successfully killed the power. For absolute certainty, use a multimeter set to AC voltage to test the wires on the wall.
Step 2: Remove the Old Thermostat and Label the Wires
With the power securely off and your reference photos saved, you can begin the dismantling process. Use your small flathead screwdriver to loosen the screws holding each wire in its terminal. As you pull each wire free, immediately tag it with a physical label. Many smart thermostats include a sheet of adhesive wire labels in the box for this exact purpose. If yours did not, masking tape and a pen work perfectly.
Label the wires according to the terminal they were plugged into, not the color of the wire itself. While there is a standard color code in the HVAC industry, previous installers may not have followed it. A red wire might not necessarily be the power wire if the last homeowner ran out of standard thermostat cable.
To help you understand what you are holding, here is a breakdown of standard terminal designations:
| Terminal Letter | Typical Wire Color | Function / What It Controls |
|---|---|---|
| R, Rc, Rh | Red | 24V Power. (Rc is for cooling power; Rh is for heating power). |
| W or W1 | White | Primary Heat. This signals your furnace to turn on. |
| Y or Y1 | Yellow | Primary Cooling. This signals your air conditioner compressor. |
| G | Green | Fan. This controls the blower fan independently of heating/cooling. |
| C | Blue or Black | Common Wire. Provides continuous return power to the thermostat. |
| O/B | Orange or Dark Blue | Reversing Valve. Used exclusively for Heat Pump systems. |
Once all the wires are labeled and disconnected, wrap them gently around a pencil. Thermostat wires have a frustrating habit of slipping back into the wall cavity once released. Wrapping them around a pencil keeps them securely anchored outside the drywall.
Remove the screws holding the old baseplate to the wall. Pull the baseplate away, carefully threading the bundled wires through the center hole. You now have a blank canvas.
Step 3: Address the C-Wire Situation
The “Common Wire,” or C-wire, is the most notorious hurdle in smart thermostat wiring. Older manual and programmable thermostats merely acted as simple on/off switches, drawing power from replaceable AA batteries or stealing a tiny trickle of power from the heating circuit. Smart thermostats are essentially mini-computers mounted to your wall. They feature bright, full-color touchscreens, active Wi-Fi chips, and motion sensors. These components require a steady, continuous flow of 24V power, which is exactly what the C-wire provides.
If you labeled a C-wire in the previous step, you are in luck. You can proceed directly to mounting the new baseplate. If you do not have a C-wire, do not panic. You have several reliable options to bridge this gap without calling an electrician.
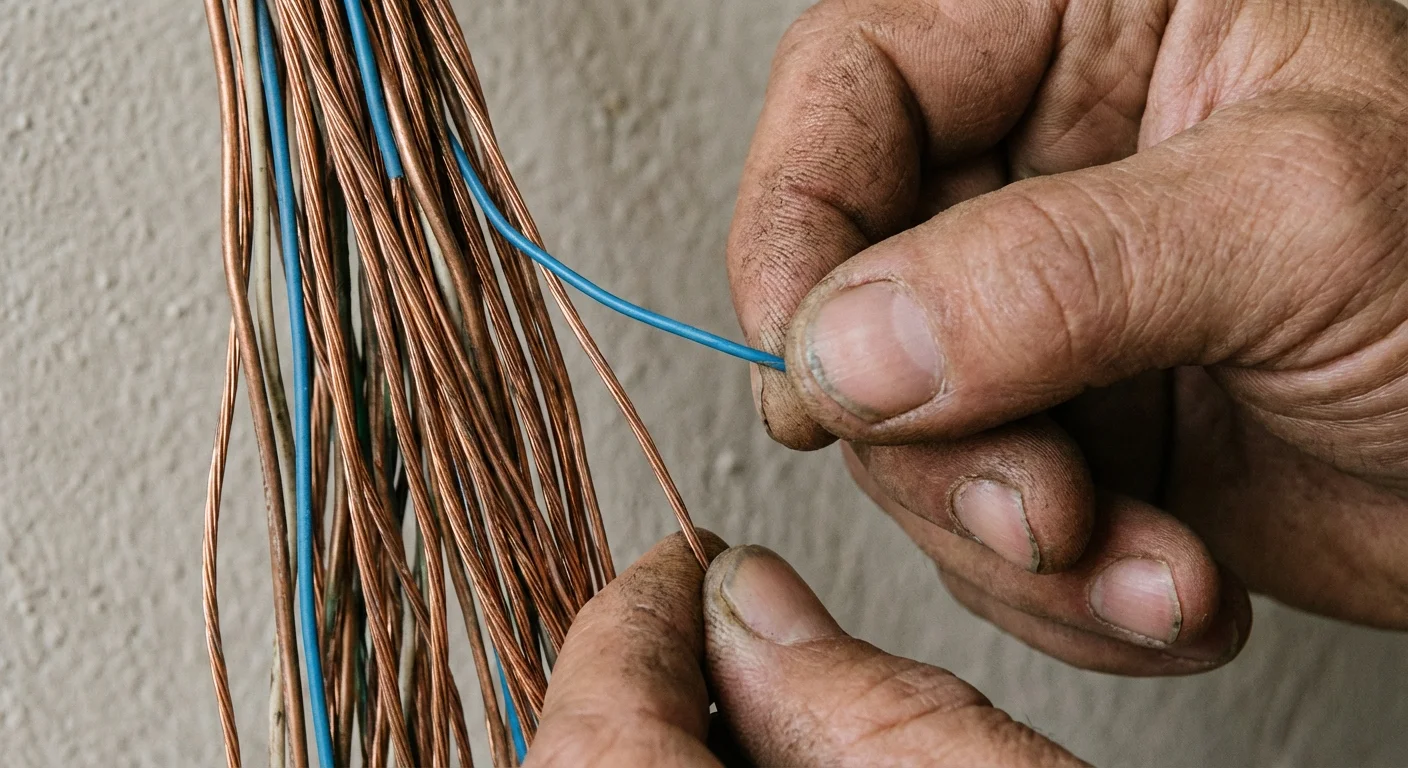
First, check the wall cavity. Gently pull the wire bundle out an inch or two. Installers frequently run thermostat cable with five or more internal wires but only hook up the four they need, leaving the unused blue or black wire wrapped around the cable jacket inside the wall. If you find a hidden wire, you can strip the end and use it as your C-wire. You will also need to go down to your furnace control board and connect the other end of that same wire to the “C” terminal.
If there is no hidden wire, look at the accessories included with your new thermostat. Brands understand this is a common issue and often provide workarounds in the box. Many units include a Power Extender Kit (PEK) or a C-Wire Adapter. These small modules wire directly into your furnace control board and multiplex the signals, allowing your existing four wires to carry both data and continuous power. Follow the manufacturer’s specific instructions for installing these adapters; the process usually takes less than fifteen minutes and requires only a screwdriver.
Step 4: Install the New Baseplate and Connect the Wires
With your wiring sorted, it is time to mount the new hardware. Take the new baseplate and thread the labeled wires through the center opening. Place the baseplate flat against the wall.
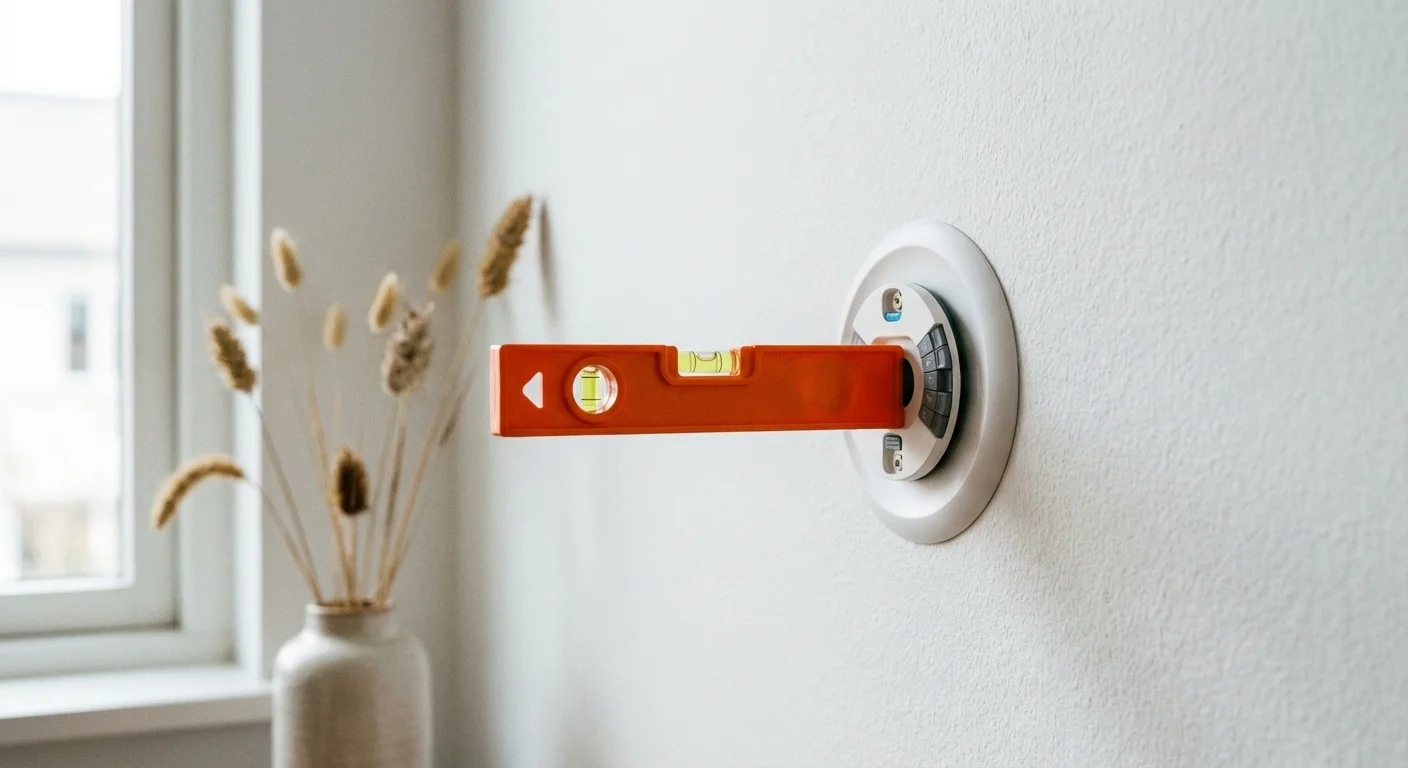
Most premium smart thermostats include a built-in bubble level on the baseplate. Use this to ensure your installation looks perfectly straight. If your model lacks a built-in level, place a small torpedo level across the top edge. Once perfectly aligned, use a pencil to mark the mounting holes on the drywall.
Set the baseplate aside. If you are drilling directly into drywall, use your drill and a 3/16-inch bit to create holes at your pencil marks. Tap the provided plastic wall anchors into the holes until they sit flush with the wall. These anchors are crucial; smart thermostats are pushed, tapped, and swiped daily, and securing them tightly prevents the unit from wobbling loose over time.
Reposition the baseplate, thread the wires back through, and drive the mounting screws securely into the wall anchors. Check the level one last time before tightening the screws completely.
Now, connect the wires to the new terminal block. Most modern baseplates use push-button terminals rather than the old screw-down style. Press the small tab down, insert the bare copper wire into the corresponding lettered hole (R to R, W to W, etc.), and release the tab. Give each wire a gentle tug to ensure it is locked into place. If a wire is too long and leaves bare copper exposed outside the terminal, use wire cutters to trim it. Exposed copper can lead to shorts. Neatly push any excess wire back into the wall cavity so the faceplate can sit flush.
Step 5: Attach the Faceplate and Restore Power
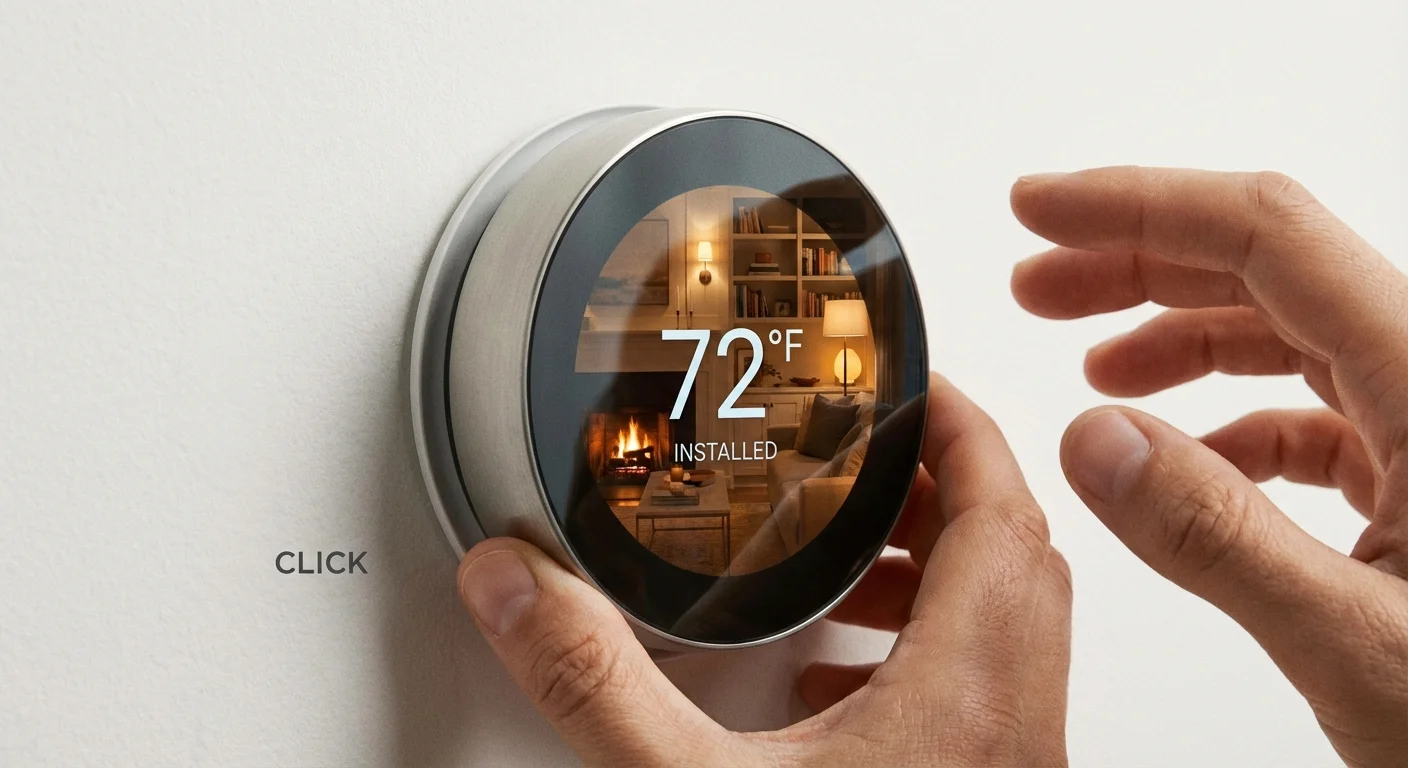
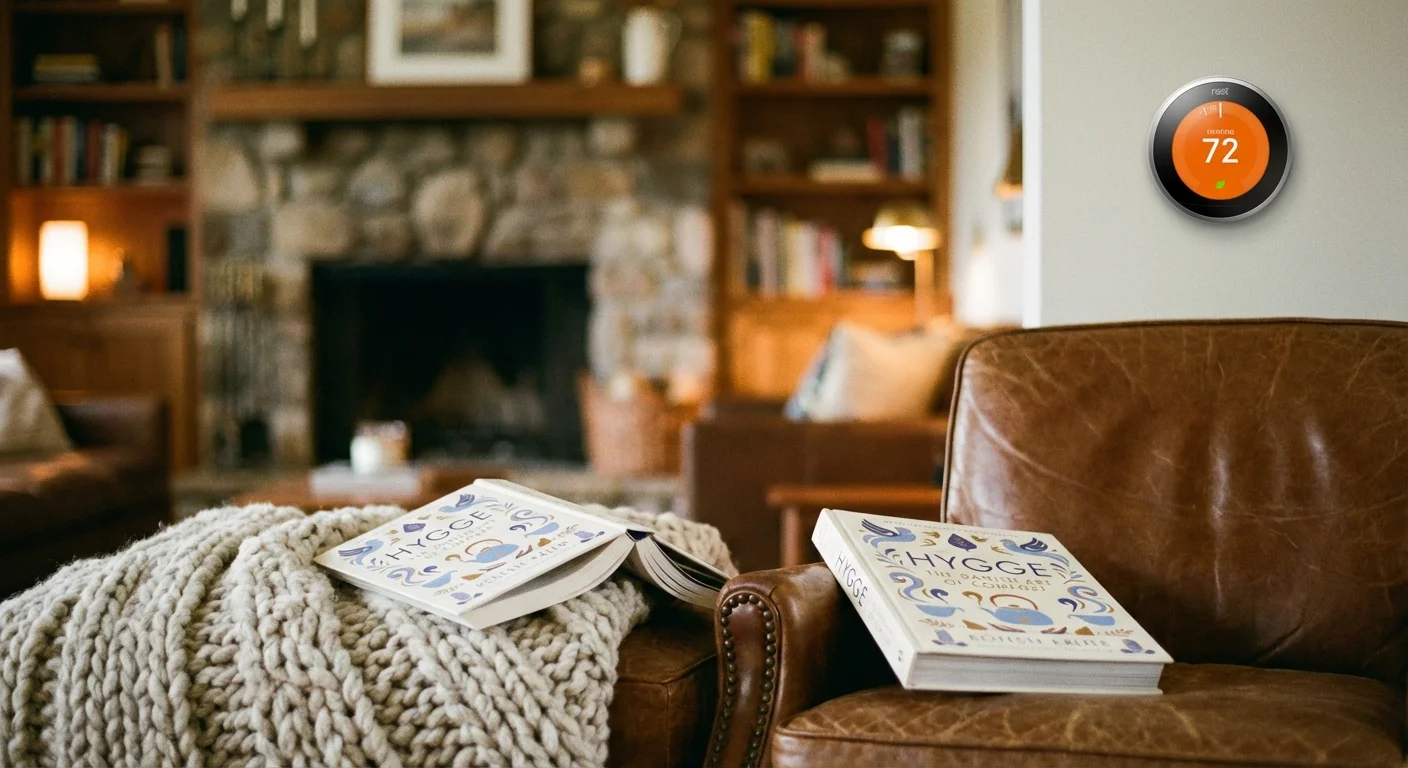
This is the most satisfying step of the process. Take the main display unit—the brain of your smart thermostat—and align it with the baseplate. Depending on the model, it will either snap directly into place with a satisfying click or slide down onto locking grooves. Ensure it is seated firmly on all sides.
Once your new device is active, you can maximize its efficiency by preparing your home for winter with a few simple weatherization steps.
Walk back to your electrical panel and flip the HVAC breaker back to the “On” position. By the time you return to the thermostat, the screen should be glowing, displaying a welcome message or a brand logo. If the screen remains dark after a few minutes, double-check that your furnace doors are securely closed (many have a safety kill switch that cuts power if the access panel is loose) and verify that the baseplate pins are making proper contact with the display.
Brand-Specific Nuances: Nest vs. Ecobee
While the underlying electrical principles are identical, different brands handle the software setup and hardware quirks differently. Understanding these nuances helps you navigate the final miles of your installation.
If you are handling a Nest thermostat installation, you will manage the majority of the setup through the Google Home app. Nest is famous for its sleek, minimalist design and its learning algorithm. During setup, the device will ask you questions about your heating system type (e.g., forced air, radiant) and fuel source (gas, electric, oil). Nest thermostats often claim they can work without a C-wire by “pulsing” the heating wires to steal power. While this sometimes works, it frequently causes the furnace relay to chatter or the HVAC system to short-cycle. If your Nest repeatedly drops Wi-Fi or displays low battery warnings, installing a C-wire adapter is the mandatory fix.
For an Ecobee setup, the process heavily emphasizes multi-room comfort. Ecobee units come with remote room sensors that detect both temperature and occupancy. You will configure these sensors via the Ecobee app, placing them in cold spots or frequently used rooms (like the main bedroom or living room). The thermostat then averages the temperature across these active rooms rather than relying solely on the temperature in the hallway where the main unit is installed. Ecobee also explicitly refuses to utilize power-stealing methods; they include a Power Extender Kit in almost every box, acknowledging that a dedicated power solution is safer and more reliable for your HVAC equipment.

What Can Go Wrong
Even with meticulous preparation, you might encounter a few hiccups during the installation process. Recognizing these common errors early saves you hours of frustrating troubleshooting.
The AC Blows Hot Air (or Vice Versa): This is the most common heart-stopping moment for homeowners with heat pumps. Heat pumps use a reversing valve to switch between heating and cooling. This valve is controlled by the O/B wire. If your AC is blowing hot air, jump into your thermostat’s advanced settings menu. Find the setting for the reversing valve and toggle the polarity (switching it from “O” to “B” or vice versa). This simple software flip almost always resolves the issue.
The System Is Completely Unresponsive: If the thermostat is lit up but the furnace refuses to kick on, check for missing jumper wires. Older systems often feature a small U-shaped metal wire bridging the Rh and Rc terminals. Most smart thermostats bridge these connections internally via software, but if you have separate heating and cooling power sources (two independent red wires), you must follow the manufacturer’s specific instructions for dual-transformer setups.
Bent Connector Pins: The display unit connects to the baseplate via tiny, fragile metal pins. If you force the faceplate onto the wall at an angle, these pins can bend or break, severing communication with your HVAC system. Always apply even, gentle pressure when attaching the screen.

When to Call a Professional
DIY home improvement builds confidence, but knowing your limits prevents catastrophic damage. According to guidelines from This Old House, certain complex HVAC configurations demand an expert touch.
Call a licensed HVAC technician if you encounter any of the following scenarios:
- Dual-Fuel Systems: If you use a heat pump for mild weather but rely on a gas or oil furnace for backup heat during freezing temperatures, the system requires exact crossover balance points. Wiring this incorrectly can cause both systems to run simultaneously, severely damaging the equipment.
- Proprietary Communicating Systems: Some high-end variable-speed HVAC systems use proprietary digital communication rather than standard 24V analogue wires. If your current thermostat only has two wires labeled A and B, or “Data 1” and “Data 2,” standard smart thermostats will not work without significant control board modifications.
- Whole-Home Accessories: Integrating built-in humidifiers, dehumidifiers, or complex multi-zone damper systems requires advanced wiring knowledge. A professional can ensure these accessories function seamlessly with your new smart hub.
Maximizing Your Smart Thermostat Post-Installation
Installation is merely the first step. To unlock the true value of your investment, you must configure the software to match your lifestyle. The real magic happens when you stop interacting with the device entirely.
Start by enabling geofencing. This feature links the thermostat to the GPS location of your smartphone (and the phones of your family members). When the app detects that the last person has left a predetermined radius around your house, it automatically shifts the HVAC system into “Eco” or “Away” mode, saving you money while the house is empty. The moment you cross back into that invisible perimeter, the system kicks back on, ensuring your home is perfectly comfortable the moment you unlock the front door.
Next, build out a realistic schedule. While learning algorithms are impressive, giving the system a baseline schedule accelerates its efficiency. Program the thermostat to drop a few degrees at night while you sleep under heavy blankets, and have it warm the house back up thirty minutes before your alarm rings. Experts from Consumer Reports note that setting your thermostat back by 7 to 10 degrees for eight hours a day can save you up to 10% a year on heating and cooling costs.
Finally, connect the thermostat to your broader smart home ecosystem. Linking it to Google Assistant, Amazon Alexa, or Apple HomeKit allows you to adjust the temperature using simple voice commands while cooking or wrangling children.
Frequently Asked Questions
Can I install a smart thermostat myself?
Yes. Manufacturers design standard low-voltage smart thermostats specifically for DIY installation. If you can hang a heavy picture frame and follow basic app instructions, you possess the necessary skills to handle the installation.
What happens if I cross the wires during installation?
Connecting the wrong low-voltage wires together usually results in strange system behavior—like the AC turning on when you request heat. However, if a power wire touches a common or ground wire while the breaker is active, you will likely blow the 3-amp or 5-amp automotive-style fuse located on your furnace’s control board. This protects the main equipment, but you will have to open the furnace to replace the fuse.
Do smart thermostats work with older homes?
Age is less important than the type of wiring. If your older home has been updated with a low-voltage central heating system (even an older gas furnace), a smart thermostat will function perfectly. The main obstacle in older homes is usually the absence of a C-wire, which you can fix using the adapters discussed earlier.
Why does my new thermostat keep losing its Wi-Fi connection?
Frequent Wi-Fi drops are a classic symptom of power starvation. If your unit is stealing power rather than relying on a dedicated C-wire, its battery levels drop too low to sustain a Wi-Fi radio connection. Installing a U-wire adapter or running a new common wire almost always stabilizes the connection.
Will a smart thermostat ruin my furnace?
No, as long as it is wired correctly. In fact, features like filter change reminders and short-cycle protection actually extend the lifespan of your HVAC equipment by preventing undue stress and maintaining proper airflow.
Wrapping Up Your Climate Control Upgrade
Upgrading your thermostat is one of the most rewarding weekend projects you can undertake. The immediate payoff of controlling your home’s climate from your couch is fantastic, but the long-term benefits of optimized energy usage and reduced utility bills are the true reward. Take the time to explore the features inside your manufacturer’s app, adjust your temperature schedules as the seasons change, and enjoy the comfort of a home that actively responds to your routine.
The tips in this article are meant as general guidance. Your specific situation—including your home’s age, layout, and local building codes—may require different approaches. When in doubt, consult a professional.
Last updated: February 2026


Leave a Reply