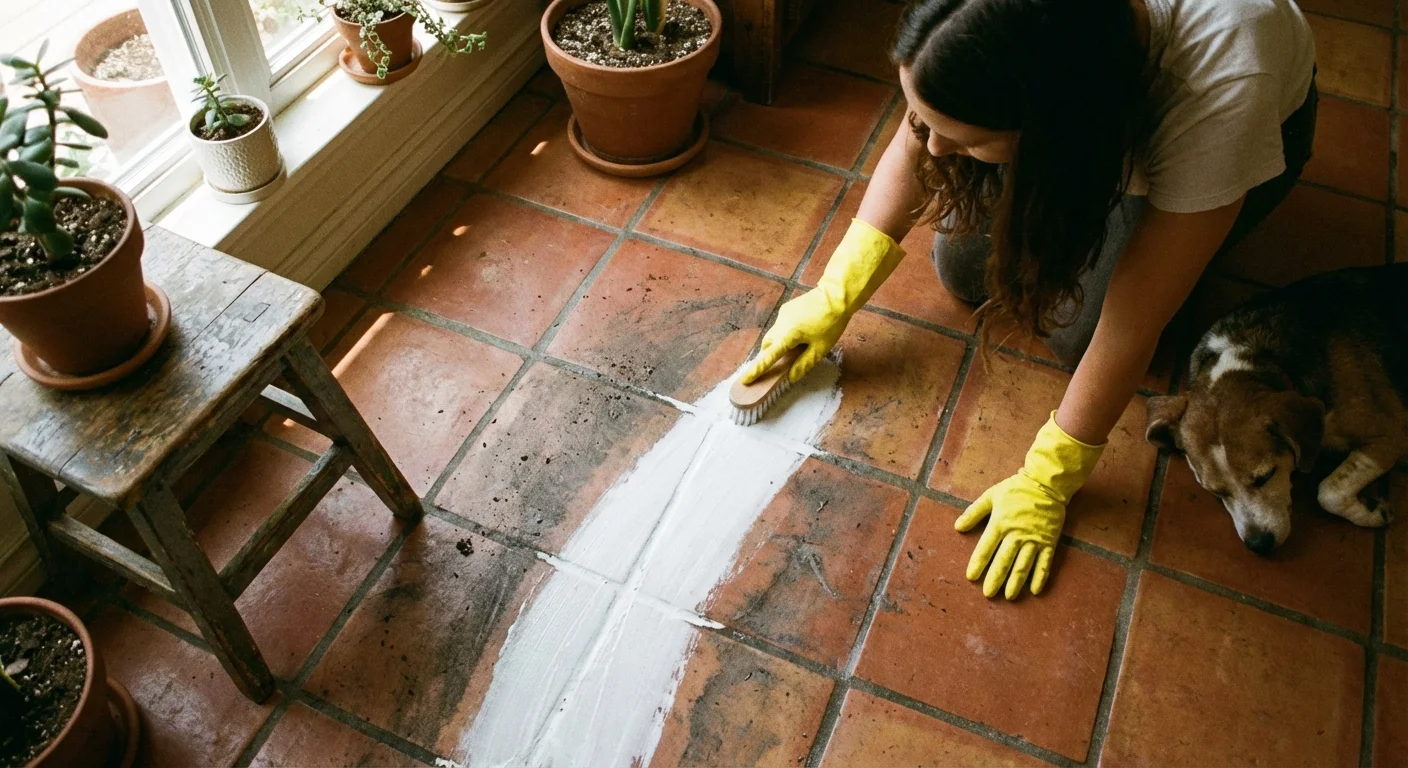
Move a rug that has sat in the same spot for three years, and you will likely experience a startling revelation: your grout was once a completely different color. What you currently view as a dark gray grid across your floor was probably installed as a crisp, bright white or a warm, sandy beige. Over time, the subtle accumulation of dirt, mop water, and foot traffic alters the appearance of your flooring so gradually that you never even notice the change happening.
Homeowners often look at a dingy floor and assume the tile itself is outdated or beyond saving. In reality, the ceramic or porcelain is likely in perfect condition. The secret to a total floor transformation does not require demolition or a massive budget; it simply requires addressing the grid holding everything together. If you want to make old tile look new, you must focus your energy entirely on the grout lines.
Restoring these porous lines requires more than aggressive scrubbing. It demands an understanding of the material, the right chemical reactions, and a methodical approach to lifting years of embedded soil. This comprehensive resource provides practical grout cleaning tips, breaks down the exact chemistry needed to tackle different stains, and guides you through the process of restoring your floors to their original glory.
Understanding Your Grout: The Anatomy of a Stain
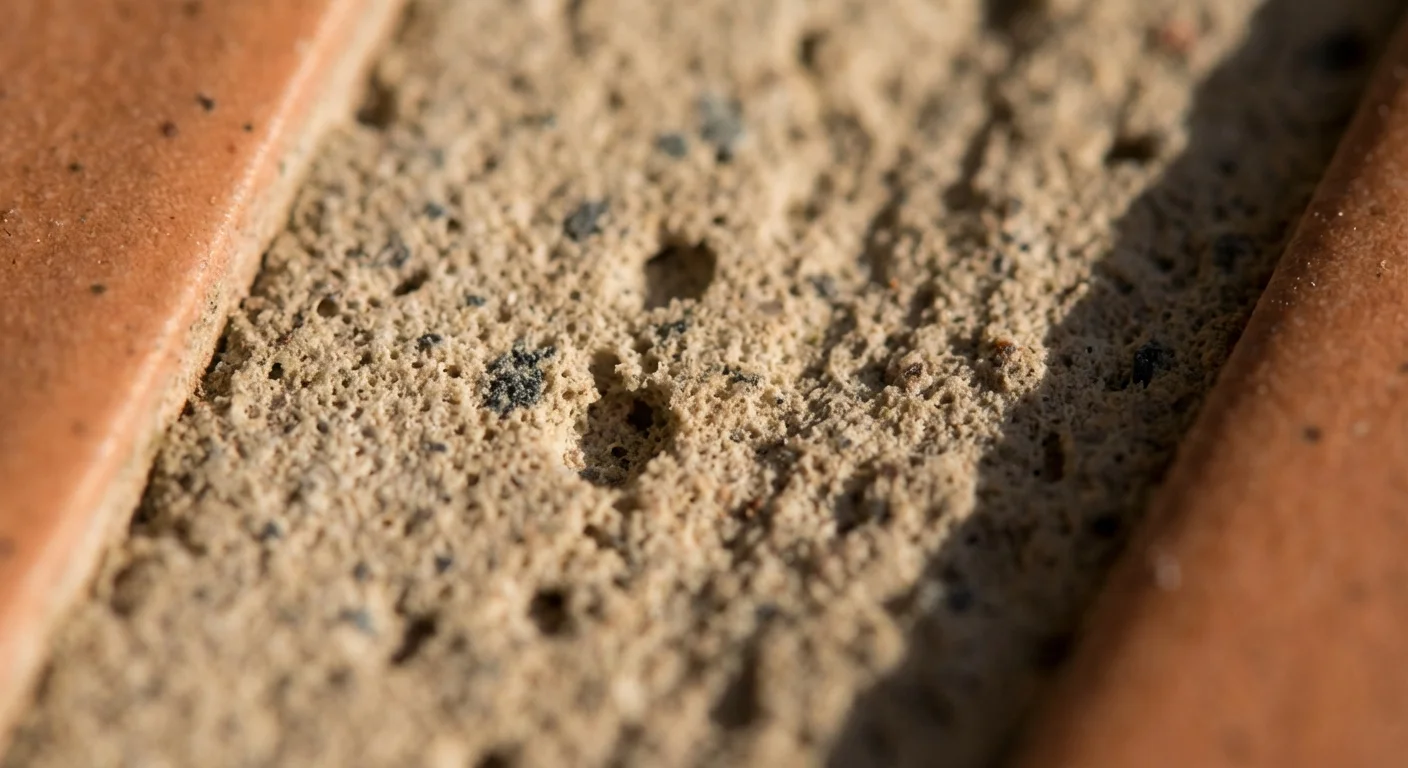
Before you grab a scrub brush, you must understand what you are actually fighting. Traditional cementitious grout—the most common type found in residential homes—is essentially a mixture of water, cement, and sand. While this composition makes it incredibly durable and capable of locking heavy tiles into place, it also creates a highly porous surface. Viewed under a microscope, unsealed grout looks like a rigid sponge.
Every time you mop your floors, the mop water pushes microscopic particles of dirt directly into these pores. When the water evaporates, the dirt remains trapped. In kitchens, atomized cooking grease settles onto the floor and creates a sticky film that binds with dust. In bathrooms, the constant humidity feeds mildew and mold spores that send microscopic roots deep into the cement.
“Because traditional grout is a porous mixture of cement and sand, it absorbs spills, dirt, and dirty mop water like a sponge. Regular maintenance and proper sealing are your only defenses against permanent discoloration.” — Bob Vila, Home Improvement Expert
This porosity is exactly why surface-level wiping never seems to work. To effectively clean grout, you need a solution that can penetrate the pores, break the chemical bonds holding the dirt and grease in place, and lift those particles to the surface where they can be wiped away.
The Essential Grout Restoration Toolkit
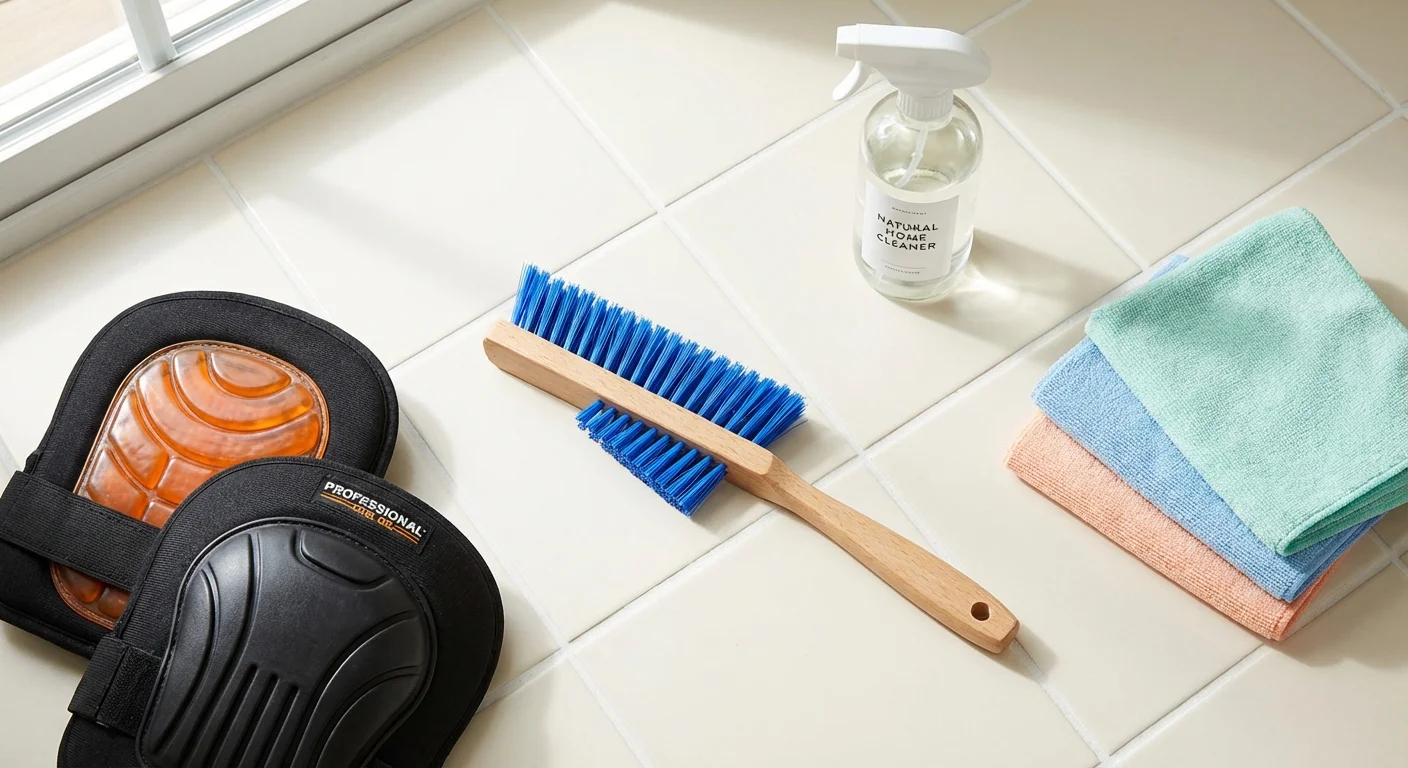
Your success depends entirely on using the correct tools. Trying to clean hundreds of feet of grout lines with an old toothbrush will leave you exhausted and frustrated. Before you mix a single cleaning solution, assemble a purpose-built toolkit.
- Nylon Grout Brush: Look for a brush with stiff, V-shaped nylon bristles. The V-shape allows the center bristles to reach deep into the recessed grout line while the outer bristles clean the tile edges.
- Knee Pads: Floor restoration is physically demanding. Invest in a pair of thick, gel-core knee pads to protect your joints during hours of scrubbing.
- Commercial Wet/Dry Vacuum: This is the secret weapon of professional tile cleaners. A wet vacuum instantly pulls dirty water out of the grout pores before it has a chance to settle back in.
- High-Quality Microfiber Cloths: Microfiber grabs and holds onto lifted dirt particles rather than simply pushing them around the tile surface.
- Pump Sprayer: A garden-style pump sprayer applies cleaning solutions evenly across large areas without requiring you to constantly squeeze a trigger bottle.
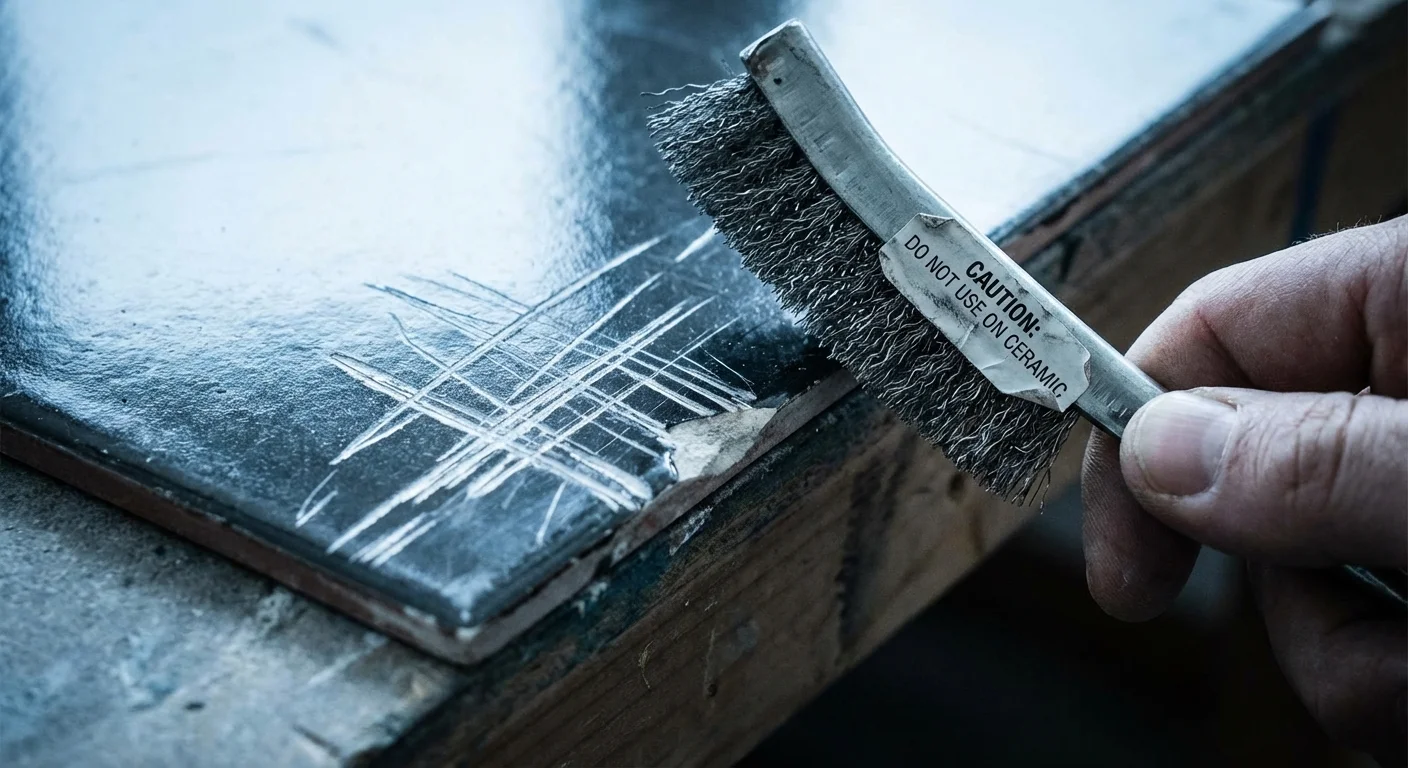
Notice what is missing from this list: wire brushes. Metal bristles will aggressively scratch the glaze on your tiles and actually gouge out pieces of the cementitious grout, permanently damaging your floor.
Evaluating Your Options: A Comparison of Cleaning Methods
No single tile grout cleaner is perfect for every situation. The approach you take in a heavily soiled mudroom will differ entirely from the gentle touch required for a lightly dusty guest bathroom. Always start with the mildest option and escalate only if the dirt refuses to budge.
| Cleaning Method | Active Ingredients | Best Used For | Effort Level | Risk to Grout |
|---|---|---|---|---|
| The Gentle Approach | Warm water, mild dish soap, baking soda | Weekly maintenance, light dust, surface spills | Low | Zero |
| The Oxygen Lift | Sodium percarbonate (Oxygen bleach), hot water | Embedded dirt, moderate food stains, general dinginess | Medium | Very Low |
| The Acid Wash | Commercial sulfamic or phosphoric acid cleaners | Hard water scale, severe mineral deposits, rust | High | Medium (Can weaken grout over time) |
| The Steam Blast | Pressurized water vapor (200°F+) | Sanitizing, loosening sticky grease, avoiding chemicals | Medium | Low (Avoid on loose or crumbling grout) |
Method 1: The Alkaline Oxygen Lift (Best for General Grime)
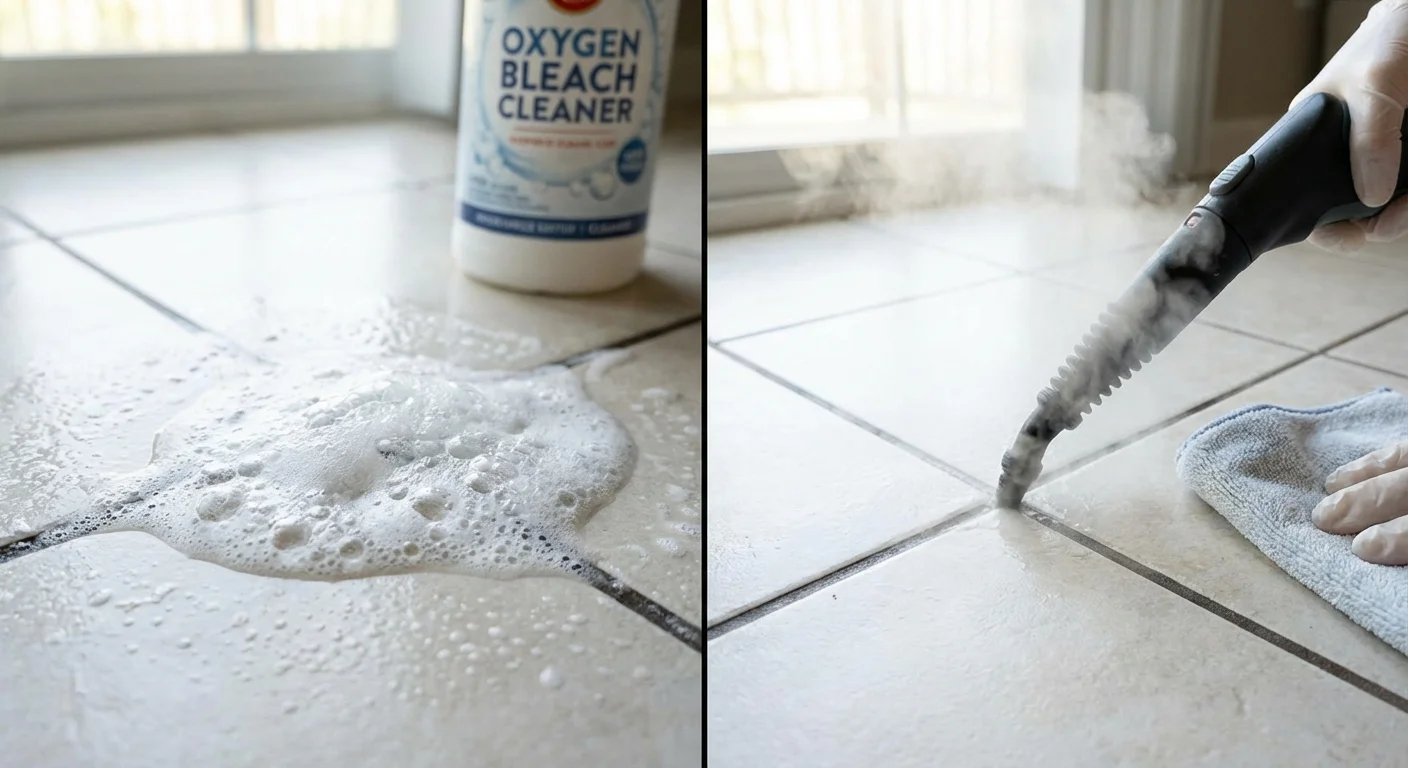
For standard foot-traffic dirt and kitchen grease, oxygen bleach is the gold standard. Unlike chlorine bleach—which simply removes the color from stains while leaving the actual dirt behind—oxygen bleach creates a vigorous chemical reaction. The active ingredient, sodium percarbonate, reacts with hot water to release thousands of tiny oxygen bubbles. These bubbles physically blast dirt particles away from the cement matrix.
Mix powdered oxygen bleach with hot water according to the manufacturer’s directions. The water must be hot to properly dissolve the powder and activate the chemical reaction. Stir until completely dissolved, then transfer the solution to your pump sprayer or a squeeze bottle.
Method 2: The Commercial Acid Wash (Best for Bathrooms)
Bathroom grout faces a different set of enemies: calcium, lime, soap scum, and hard water deposits. These alkaline stains laugh at oxygen bleach. To dissolve mineral buildup, you must drop the pH scale and use an acidic tile grout cleaner.
Commercial acid cleaners typically rely on sulfamic or phosphoric acid. These acids eat away the mineral deposits and actually dissolve a microscopic top layer of the grout itself, exposing the fresh, clean layer underneath. Because acids literally eat away cement, you must use them sparingly and rinse them thoroughly. For excellent guidance on choosing safe commercial products, consult the cleaning experts at Good Housekeeping.
The Ultimate Grout Whitening Guide: Step-by-Step
Having the right cleaner is only half the battle; execution dictates the final result. Professionals achieve stunning results because they follow a strict, methodical process. This step-by-step grout whitening guide will walk you through the exact procedure required to pull deep, historical stains out of your floors.
Step 1: Dry Soil Removal
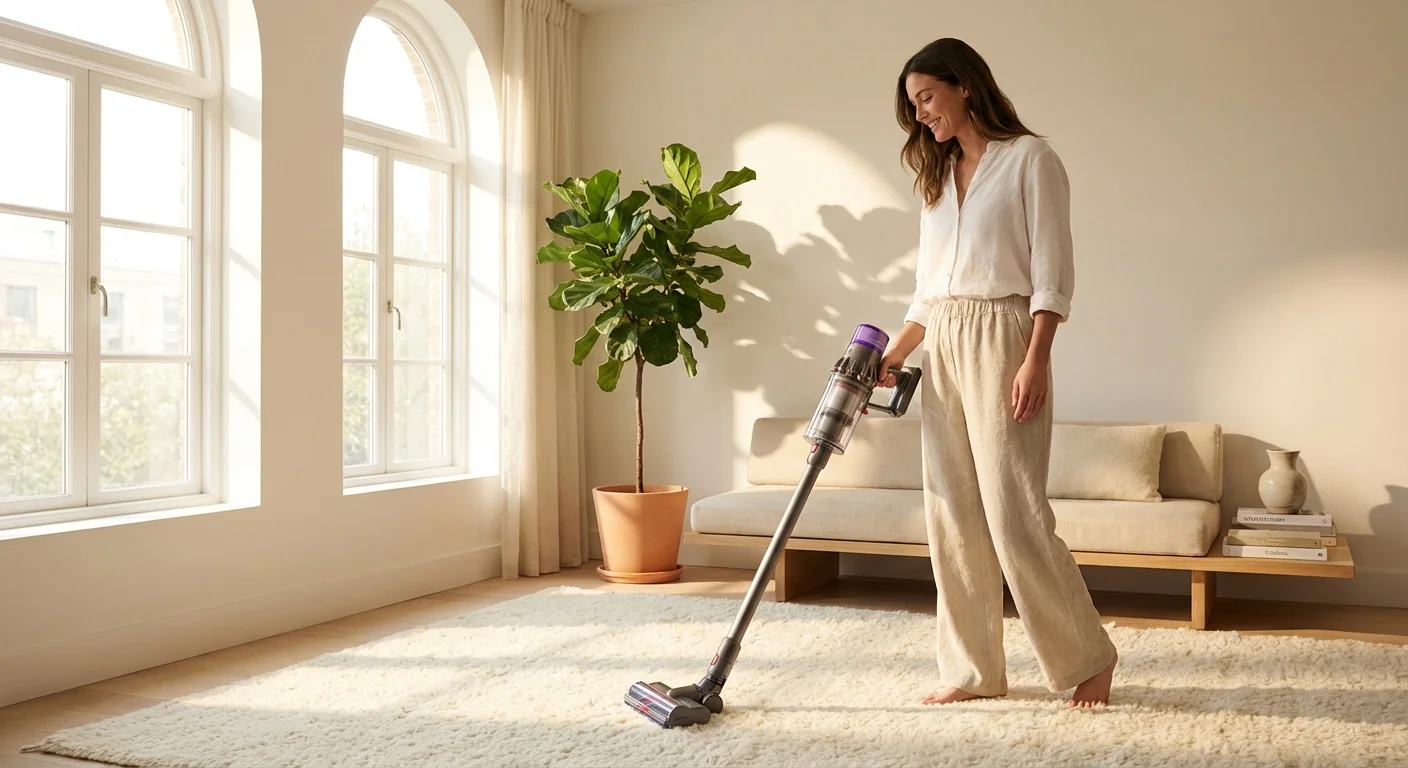
Never apply liquid to a floor covered in loose debris; you will simply create mud and drive the dirt deeper into the grout lines. Sweep the floor thoroughly, then use a standard vacuum with a hard-floor attachment to pull dust out of the crevices.
Step 2: Pre-Wetting
This is a critical step that most homeowners skip. Lightly damp mop the floor with plain, hot water. Cementitious grout acts like a sponge. If you apply an expensive, concentrated cleaning chemical to dry grout, the grout will immediately suck the liquid down to the subfloor where it does no good. Pre-wetting fills the deepest pores with plain water, forcing your cleaning solution to remain near the surface where the visible dirt lives.
Step 3: Application and Dwell Time
Apply your chosen cleaning solution generously to the grout lines. Do not simply mist the surface; the grout line should be pooled with liquid. Now comes the most important part of the entire process: walk away.
You must allow the product a minimum of 10 to 15 minutes of “dwell time.” The chemical agents need time to penetrate the soil, break down grease bonds, and release the dirt from the cement. Scrubbing immediately after application wastes the product and relies entirely on your physical energy rather than the chemical’s power.
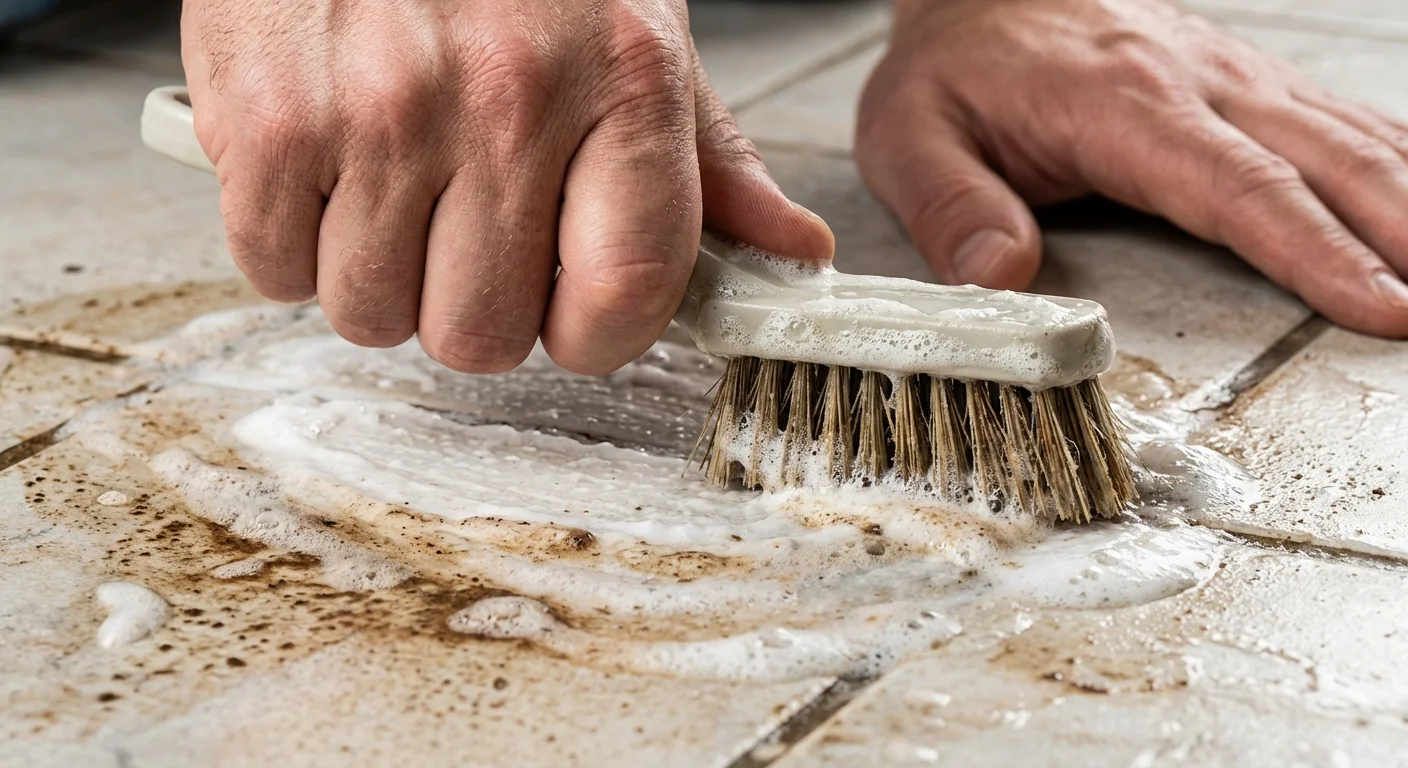
Step 4: Agitation
Once the dwell time has elapsed, grab your stiff nylon brush. Scrub briskly back and forth along the grout line. Because you allowed the product to dwell, the dirt should lift with moderate effort. You will see the cleaning solution turn dark as the trapped soil is released into the liquid.
Step 5: The Crucial Extraction
Now that the dirt is suspended in the liquid, you must remove it before it settles back into the pores. Wiping with a traditional mop usually just spreads this dirty slurry across the tiles. Instead, use your wet/dry vacuum to suck the dirty liquid directly out of the grout lines. If you do not own a wet vacuum, use highly absorbent microfiber towels, swapping them out frequently for clean ones.
Step 6: The Neutralizing Rinse
Cleaning chemicals left behind will act as a dirt magnet, causing your floor to look filthy again within weeks. Mop the entire floor with clean, warm water to dilute and remove any residual chemicals. Dry the floor thoroughly with fresh towels.
How to Restore Grout When Cleaning Fails
Sometimes, despite your best efforts, scrubbing will not yield the desired results. If the grout was never sealed, heavy stains like red wine, pet accidents, or oil may have permanently dyed the cement. Furthermore, older grout may be structurally sound but permanently mottled and discolored. When traditional cleaning methods fail, you have two primary options for how to restore grout: color sealing or regrouting.
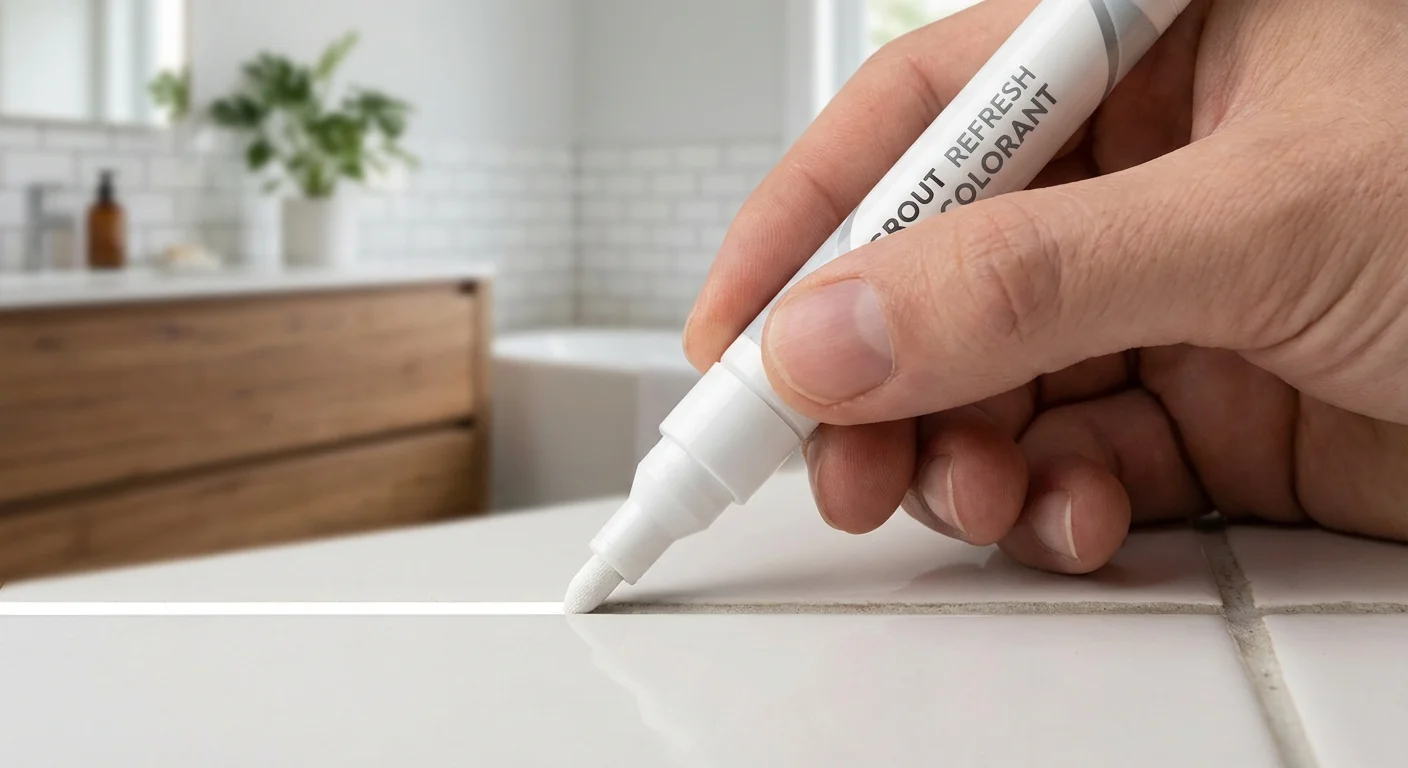
Option 1: Grout Colorants (Epoxy Color Sealing)
A grout colorant—often sold in small bottles or applicator pens—is essentially an epoxy-based paint designed specifically to bond with cementitious grout. This is a game-changer for permanently stained floors. The colorant sits on top of the old grout, covering all historical stains with a fresh, uniform color, while simultaneously acting as a heavy-duty sealant against future spills.
You apply the colorant using a narrow brush or applicator tip, painting it meticulously along every grout line. Once you apply the colorant, you must wipe away any excess that gets onto the surrounding tile before it dries. The result is a crisp, perfectly uniform grid that makes the entire floor look brand new. You can even change the color entirely—turning a dated dark brown grout into a modern, bright white.
Option 2: Total Regrouting
If your grout is actively crumbling, missing in chunks, or turning into powder when you scrub it, cleaning and painting will not help. The structural integrity is gone. In these cases, regrouting is necessary.
Regrouting involves using a carbide-tipped grout saw or an oscillating multi-tool to scrape out the top layer of the old grout. You do not need to remove it all the way down to the subfloor; removing the top 1/8 to 1/4 inch is usually sufficient. Once the old layer is removed, you mix a fresh batch of grout and apply it over the tile using a rubber float, pressing it firmly into the joints. After the grout cures, you wipe away the haze, leaving a flawless, brand-new installation. For detailed tutorials on the physical removal of old grout, the experts at This Old House offer excellent step-by-step guidance.
Pitfalls to Watch For
Tile floors are durable, but they are not indestructible. Many homeowners accidentally inflict permanent damage on their flooring by using the wrong techniques or chemicals. Protect your investment by avoiding these common pitfalls.
Relying on Chlorine Bleach
Standard household bleach is a powerful disinfectant, but it is an incredibly harsh chemical. Frequent use of straight bleach will strip the color from colored grouts, dry out the cement matrix, and cause the grout to become brittle and crumble over time. Furthermore, bleach does not dissolve dirt; it simply bleaches it invisible. The soil is still there, waiting to attract more dirt.
Using Vinegar on Natural Stone
White vinegar is a popular DIY cleaning ingredient, but it is an acid. While an acid might help clean standard ceramic or porcelain tile, it will severely damage natural stone. If you have marble, travertine, limestone, or slate flooring, acidic cleaners (including vinegar and lemon juice) will instantly etch the surface, leaving dull, permanent chemical burns across your expensive tiles.
Skipping the Sealant
Spending an entire weekend scrubbing your floors only to skip the sealing process guarantees that you will have to repeat the brutal scrubbing process a few months later. Unsealed grout is unprotected grout. Always apply a high-quality penetrating sealer 24 to 48 hours after your final cleaning to lock out future stains.
Using Too Much Water During Cleanup
When rinsing cleaning solutions or wiping away fresh grout haze, wring your sponge out until it is barely damp. Flooding the floor with excess water will dilute the chemical bonds of the grout or push dirty water back into the pores you just spent hours cleaning.

Getting Expert Help
While the techniques outlined above are highly effective for standard residential maintenance, certain situations require professional intervention. Know when to put away the scrub brush and call a specialized tile and grout restoration company.
- Vast Square Footage: Scrubbing the grout in a small bathroom is a manageable weekend project. Attempting to manually scrub 2,000 square feet of open-concept living space will take weeks and exact a heavy physical toll. Professionals use truck-mounted hot water extraction units that clean and vacuum vast areas simultaneously.
- Failing Subfloors: If your grout is constantly cracking and falling out, the problem is likely not the grout itself. This usually indicates movement in the subfloor beneath the tile. A professional contractor can assess the joists and subfloor for structural flex or water damage.
- Delicate Natural Stone: Premium materials like polished marble require specialized pH-neutral cleaners and delicate handling. Professionals understand the specific chemical tolerances of natural stone and can hone, polish, and restore the surface without risking expensive etching or discoloration.
- Epoxy Grout Installations: Modern epoxy grout is virtually stain-proof and incredibly hard, but if it was installed incorrectly or requires removal, it is notoriously difficult to extract. Professional-grade heat guns and specialized chemical strippers are often required.

Protecting Your Hard Work: Proper Sealing Techniques
Once you successfully make old tile look new, your immediate priority shifts to preservation. Grout sealer fills the microscopic pores in the cement, creating a barrier that prevents liquids and dirt from penetrating. Think of it as a clear coat of wax on a freshly detailed car.
There are two main types of sealers: penetrating and membrane-forming. Penetrating sealers are the preferred choice for residential indoor environments. They soak deep into the cement and protect from within while still allowing the grout to breathe and release moisture vapor. Membrane sealers form a physical film on top of the grout; while highly protective, they can become cloudy over time or peel if applied to a damp floor.
To apply a penetrating sealer, wait until your newly cleaned grout is completely dry—usually 24 to 48 hours after your final rinse. Use a specialized applicator wheel or a small foam brush to paint the sealer directly onto the grout lines. Allow the sealer to absorb for 5 to 10 minutes, then use a clean, dry microfiber cloth to thoroughly wipe any excess sealer off the face of the tiles. If sealer dries on the tile glaze, it leaves a stubborn, sticky haze.
Test your sealant annually by dropping a few beads of water onto the grout in a high-traffic area. If the water beads up like rain on a freshly waxed car hood, your sealant is still active. If the water darkens the grout and absorbs into the floor, it is time to reapply. For comprehensive advice on protecting different types of flooring, the The Spruce offers extensive guides on long-term maintenance routines.
Frequently Asked Questions
Does bleach damage grout?
Yes, frequent use of undiluted household chlorine bleach will deteriorate cementitious grout over time. It dries out the cement matrix, making it brittle and prone to cracking. It will also permanently strip the dye out of colored grouts, leaving a splotchy, uneven appearance.
Can I use a steam cleaner on all grout?
Steam cleaners are highly effective for loosening dirt and sanitizing standard tile floors, but they should be used with caution. The intense heat and pressure can blow loose pieces of older, crumbling grout out of the joints. Additionally, steam cleaners should never be used on floors treated with an epoxy colorant, as the heat can soften and strip the color seal.
How often should I seal my grout?
In high-traffic areas like kitchens and mudrooms, or wet areas like shower enclosures, you should apply a fresh coat of penetrating sealer annually. In low-traffic areas like guest bathrooms, sealing every two to three years is generally sufficient. Always perform the water-drop test to verify if the current seal has degraded.
Is it better to clean or regrout?
Always attempt to clean first. If the grout is physically sound—meaning it is hard, flush with the tile, and not crumbling—cleaning or applying an epoxy colorant is the most cost-effective and least labor-intensive route. You should only undertake the laborious process of regrouting if the existing grout is structurally failing or missing in significant sections.
Why does my grout look dirty again so quickly after cleaning?
This rapid re-soiling is almost always the result of a skipped step during the cleaning process. If you do not thoroughly rinse the floor to remove the residual cleaning chemicals, those sticky residues remain on the floor and act as a magnet for new dirt. Alternatively, if you failed to apply a sealer after cleaning, the porous grout simply absorbed the next spill or batch of dirty mop water.
Moving Forward with Clean Floors
Restoring dirty, discolored grout requires patience, physical effort, and the right combination of tools and chemicals. By understanding the porous nature of your flooring, allowing your cleaning products the proper dwell time, and protecting your final results with a high-quality sealant, you can dramatically transform the appearance of any room. You do not have to live with a dingy grid mapping out your floor; a brighter, cleaner home is entirely within your reach.
The tips in this article are meant as general guidance. Your specific situation—including your home’s age, layout, and local building codes—may require different approaches. When in doubt, consult a professional.
To prevent future grime buildup, try adding a quick tile check to your weekly house cleaning schedule to keep your floors looking pristine.
Last updated: February 2026


Leave a Reply