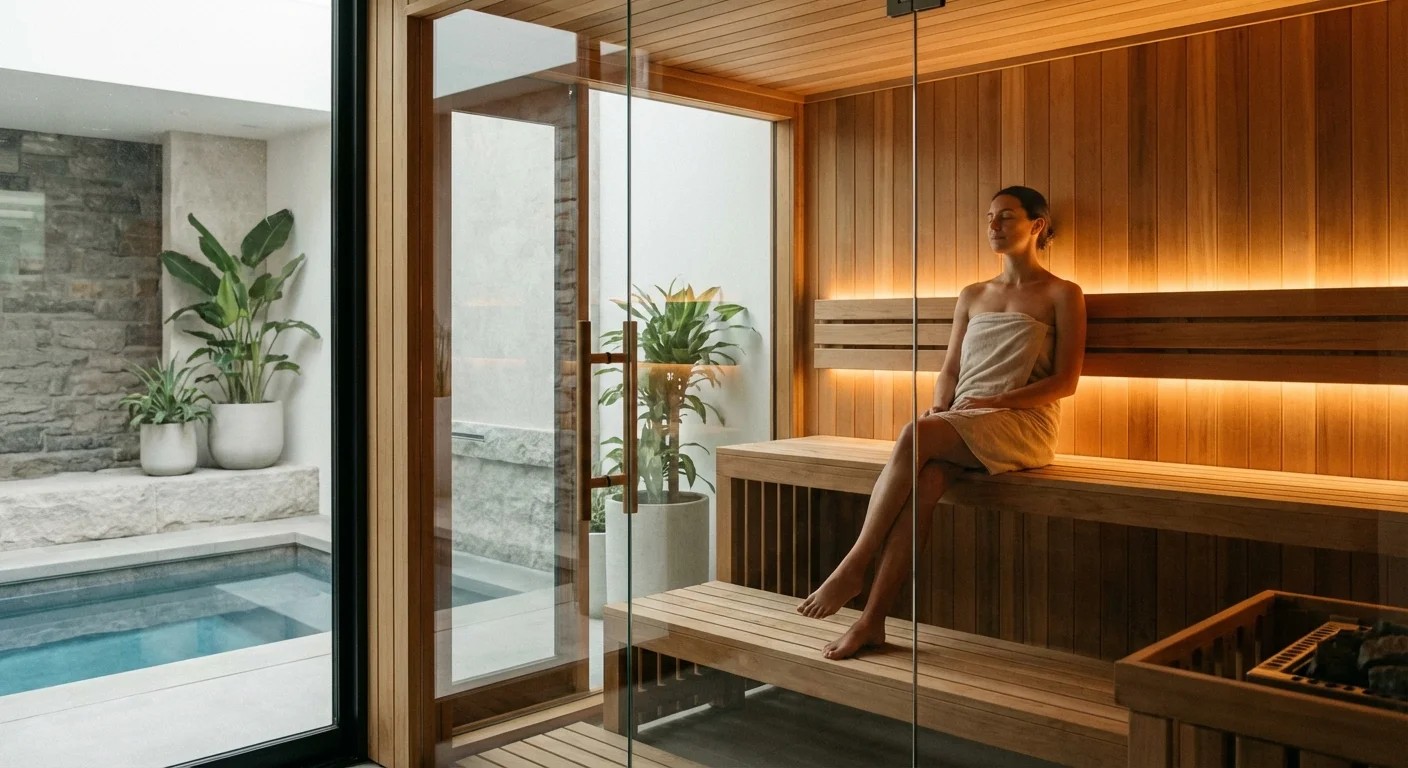
Stepping into a sauna after a long day used to require a gym membership, a spa appointment, or a luxury hotel stay. Today, creating a personal wellness retreat right inside your own house is entirely achievable, regardless of your square footage or financial constraints. The wellness landscape has shifted rapidly over the past few years, bringing home sauna technology out of luxury custom mansions and into spare bedrooms, basement corners, and converted walk-in closets.
Heat therapy is a powerful tool for wellness, and it works best when integrated with other environment changes that reduce stress throughout your living space.
Whether you crave the intense, eucalyptus-scented heat of a traditional Finnish sauna or the gentle, muscle-soothing warmth of an infrared cabin, planning your installation requires a strategic approach. Heat, moisture, and electricity demand careful consideration to ensure your new sanctuary remains safe, efficient, and enjoyable. This comprehensive guide walks you through the best home sauna options on the market, helping you navigate the practical realities of bringing the spa experience home.
Understanding Your Primary Sauna Options
Before pulling out the measuring tape or calling an electrician, you need to understand the distinct types of saunas available. The technology you choose dictates the electrical requirements, the ventilation needs, and the overall physical footprint of the unit.
While saunas provide beneficial dry heat, you can balance the air quality in the rest of your house by using one of the best humidifiers for every room to prevent dry skin and respiratory issues.
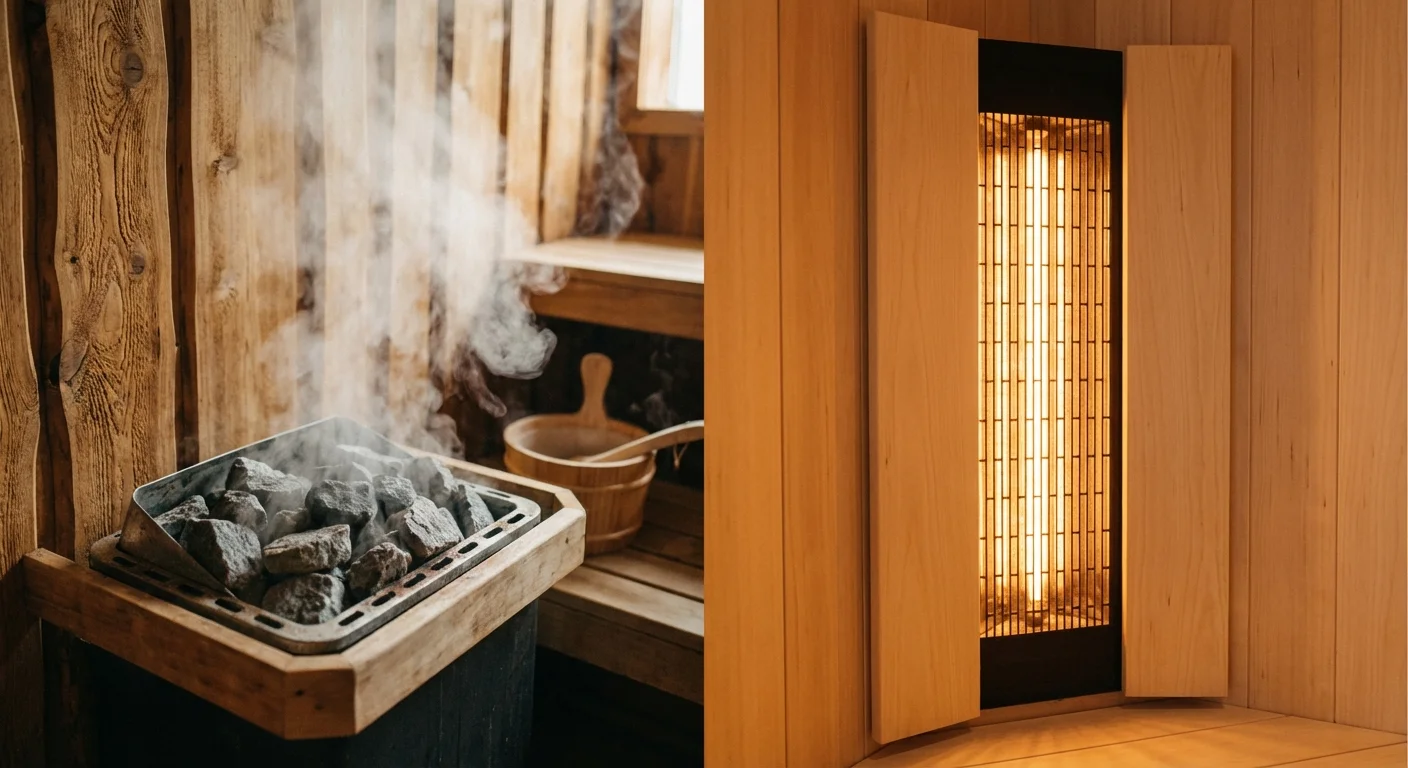
Traditional Finnish Saunas
Traditional saunas utilize an electric or wood-burning stove filled with rocks. Once the rocks reach an optimal temperature, you pour water over them to create sudden bursts of steam—often called löyly. These environments reach staggering temperatures, typically between 150°F and 195°F, while maintaining relatively low humidity until you introduce water. Traditional units require significant power, specialized wood that resists moisture, and proper ventilation to manage the heat output.
Infrared Saunas
If you prefer a gentler heat, an infrared sauna for home use might be your ideal match. Rather than heating the air around you, infrared panels use electromagnetic radiation to warm your body directly. They operate at much lower temperatures—usually between 110°F and 140°F—making them more comfortable for extended sessions. Because they do not use water or create steam, infrared models are inherently easier to install indoors, often functioning simply by plugging into a standard or dedicated household outlet.
Steam Rooms (A Quick Distinction)
Though often grouped with saunas, steam rooms are entirely different beasts. They operate at lower temperatures (around 110°F to 120°F) but maintain 100 percent humidity. Building a steam room requires complete waterproofing, sloped ceilings to prevent dripping, and a dedicated plumbing setup. For this guide, we will focus strictly on dry heat and infrared saunas.
Sauna Comparison at a Glance
| Feature | Traditional Sauna | Infrared Sauna |
|---|---|---|
| Heat Source | Electric heater with rocks (or wood stove) | Carbon or ceramic infrared panels |
| Temperature Range | 150°F – 195°F | 110°F – 140°F |
| Warm-Up Time | 30 to 45 minutes | 10 to 20 minutes |
| Moisture Level | Dry, with bursts of steam when water is added | Completely dry (no water used) |
| Installation Difficulty | Moderate to High (often requires 240V and venting) | Low to Moderate (many are 120V plug-and-play) |
“A home sauna is no longer just a luxury add-on; it is a dedicated space for recovery and mental clarity that can be integrated into almost any footprint. The key is treating the installation less like placing a piece of furniture and more like introducing a new micro-climate to your home.” — Architect and Interior Designer, Sarah Blank

Exploring Indoor Sauna Ideas for Different Spaces
Finding the right location is the most critical step in your home sauna setup guide. You do not need a sprawling basement to make this work; you simply need a dry, level surface and access to appropriate power. When brainstorming indoor sauna ideas, look for underutilized square footage.
If you are working with limited square footage, there are many design tricks to make a small bathroom feel bigger while still accommodating a compact sauna unit.
The Primary Bathroom Extension: If you have a large primary bathroom, dedicating a corner to a pre-built infrared unit creates a seamless transition from sweat session to cold shower. This location is ideal because bathroom floors are already designed to handle moisture and frequent cleaning.
The Basement Retreat: Basements offer natural soundproofing and plenty of square footage, making them the most popular location for larger, traditional saunas. Concrete basement floors provide a perfect, fire-safe foundation. Just ensure your basement is dry; excess ambient moisture combined with sauna heat can encourage mold growth outside the unit.
Converted Closets and Spare Rooms: You can transform a walk-in closet or a small home gym into a wellness room. Many modular infrared saunas require only a 4-by-4-foot footprint. Keep in mind that you must leave a few inches of clearance between the sauna walls and your room’s drywall to allow the wood to breathe and to facilitate airflow.
For more inspiration on seamlessly blending large installations into your existing home architecture, HGTV offers excellent visual galleries of basement and bathroom renovations that incorporate wellness spaces naturally.

Breaking Down the Home Sauna Cost
The home sauna cost spectrum is incredibly broad, allowing entry points for nearly every budget. Setting realistic financial expectations upfront prevents project abandonment midway through.
While a sauna is an investment, you can offset its operational costs by learning how to reduce energy bills in other areas of your home.
- Portable Sauna Tents and Blankets ($150 – $600): If you rent your home or have zero floor space to spare, infrared sauna blankets or pop-up tents are highly effective alternatives. They fold away under a bed when not in use and plug into any standard wall outlet.
- Prefabricated Infrared Kits ($1,500 – $4,500): This is the sweet spot for most homeowners. These modular units arrive flat-packed on a pallet and latch together with simple buckles or magnetic clasps. They look like high-end furniture, usually crafted from Canadian Hemlock or Cedar, and comfortably seat one to three people.
- Prefabricated Traditional Kits ($3,000 – $7,000): Because traditional saunas require thicker wood, heavier insulation, and robust electric rock heaters, the base price is naturally higher. You must also factor in the cost of hiring an electrician to install a 240V outlet.
- Custom Built-in Saunas ($7,000 – $15,000+): Framing a permanent room, lining it with premium western red cedar, building custom multi-tier benches, and installing commercial-grade heaters represents the high end of the market. This route adds permanent value to the home but requires specialized contractors.
Don’t forget to account for running costs. According to data available through Energy Star guidelines regarding household appliance usage, an average home sauna draws about as much power as a clothes dryer or electric oven. Running a 4.5 kW traditional heater for one hour will cost you roughly 60 to 80 cents, depending on your local utility rates. Infrared saunas are even more efficient, often costing less than 30 cents per session.

The Step-by-Step Home Sauna Setup Guide
Once you purchase your kit or finalize your custom design, the physical preparation of the room begins. Proper preparation prevents costly moisture damage and electrical hazards down the road.
1. Assess and Upgrade Your Electrical Capacity
Electrical requirements are the single biggest hurdle in sauna installation. Small, one-person infrared units often run on a standard 120V/15-amp household outlet. However, two-person infrared models usually require a 120V/20-amp dedicated receptacle—meaning no other devices can share that circuit breaker. Traditional electric heaters almost universally require a dedicated 240V circuit hardwired by a professional. Before buying anything, check your main electrical panel to ensure you have physical space for a new breaker and sufficient overall amperage capacity.
2. Choose the Right Flooring
Saunas generally do not come with built-in floors; they utilize the existing floor of your room. You must never install a sauna over carpet. Carpet traps heat, breeds bacteria from sweat, and poses a severe fire hazard. The best flooring materials are concrete, ceramic tile, or luxury vinyl plank. If you must place your unit in a carpeted room, you must cut away the carpet and install a solid, hard-surface base beneath the unit’s footprint.
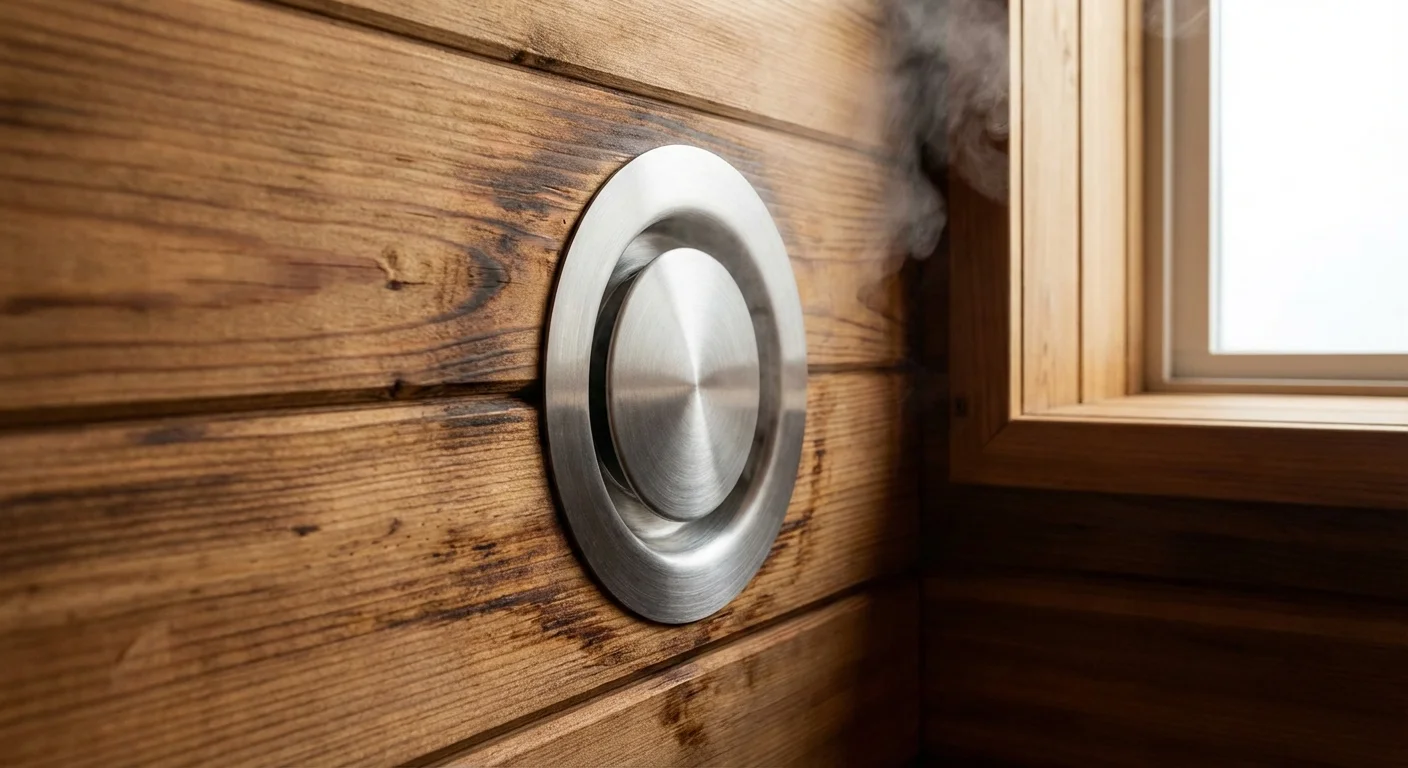
3. Plan for Airflow and Ventilation
Traditional saunas require passive ventilation to pull fresh air in and push stale air out, keeping the heater functioning properly and preventing you from feeling lightheaded. Typically, an intake vent sits low beneath the heater, while an exhaust vent sits high on the opposite wall. Infrared units require less aggressive ventilation, but you still need an ambient room environment that allows the exterior wood cabinet to breathe.
For detailed guidance on safely managing residential wiring and dedicated circuits, consult resources from This Old House, which provides comprehensive overviews on understanding home electrical panels.

Professional vs. DIY: Which Route is Right for You?
Deciding whether to tackle the installation yourself or hire a crew depends entirely on the type of sauna you select.
When to DIY: Modular, prefabricated infrared saunas are designed explicitly for DIY installation. If you can build a flat-pack bookcase, you can assemble a modular sauna. The wall panels lock together with pre-installed hardware, and the electrical connections between the carbon panels use simple plug-and-play jumper cables hidden in the roof dust cover. Two reasonably fit adults can usually assemble a standard kit in under two hours.
When to Hire a Professional: You should bring in licensed professionals for three specific scenarios. First, anytime you need to upgrade your electrical panel or run a new 240V line, hire a certified electrician. Second, if you are building a custom sauna from scratch, a carpenter experienced in sauna construction is vital—regular framing methods do not account for the extreme expansion and contraction of wood under intense heat. Finally, if you are converting an existing bathroom space and need to move plumbing lines to accommodate the sauna footprint, a plumber is strictly necessary.
Common Mistakes to Avoid
Even with careful planning, enthusiastic homeowners can fall into a few predictable traps when setting up their wellness space.
To complete your home retreat, lean into the art of hygge by keeping soft robes, slippers, and dim lighting nearby to transition smoothly out of your session.
- Ignoring Exterior Clearances: Shoving a wooden sauna flush against a drywall corner restricts airflow and can cause the sauna wood to warp or the drywall to harbor mold. Always leave at least two to three inches of clearance around the back and sides, and ample space above the roof.
- Using Treated Wood for Custom Builds: If you are modifying a kit or building from scratch, never use pressure-treated lumber, plywood, or wood with heavy knots inside the cabin. High temperatures cause treated wood to off-gas toxic chemicals, and sap trapped in knots can boil and cause burns. Stick to clear cedar, hemlock, or Nordic spruce.
- Overlooking Door Swings: Sauna doors must always open outward for safety reasons—if you feel faint, you need to be able to push your way out effortlessly. Ensure your chosen location has enough clearance for the glass door to swing completely open without hitting a toilet, vanity, or structural column.
Frequently Asked Questions
Do home saunas increase property value?
A beautifully integrated, custom-built traditional sauna can add appeal for the right buyer, particularly in colder climates or high-end real estate markets. However, prefabricated, modular saunas are considered personal property—much like a hot tub or a piece of furniture—and you take them with you when you move. They rarely impact the appraised value of the home.
How difficult is it to maintain an indoor sauna?
Maintenance is surprisingly minimal. For infrared models, wipe down the benches with a damp cloth after use and occasionally clean the interior with a heavily diluted solution of water and white vinegar. Traditional saunas require you to periodically scrub the benches with a specialized sauna wood cleaner and replace the heater rocks every few years as they begin to crack from the heat stress.
Can I install an indoor sauna in an unheated garage?
You can, but it will significantly impact the warm-up time and energy efficiency. Traditional saunas handle cold ambient environments better than infrared models. If you place an infrared unit in a freezing garage, the panels will struggle to reach their maximum temperature. If an unheated garage is your only option, look for specially designed outdoor or heavily insulated models.
Taking the Next Step Toward Your Home Retreat
Creating a home sauna is an investment in your daily physical recovery and mental well-being. Start by measuring your available space and identifying the nearest electrical outlets. Once you decide between the deep, penetrating heat of an infrared cabin or the steamy, intense environment of a traditional Finnish stove, you can narrow down your options to match your budget.
Take your time selecting the right wood and evaluating your home’s electrical capacity. A well-planned installation ensures that your new wellness room becomes a daily sanctuary rather than a stressful remodeling headache. Turn on the heat, grab a towel, and prepare to sweat the stress away right in the comfort of your own home.
This guide provides general home improvement information. Every home is different—what works in one space may need adaptation in yours. For structural changes or electrical/plumbing work, consult a licensed professional.
Last updated: February 2026


Leave a Reply